Fruity Pebbles Cheesecake Tacos-Sweet Dessert Dream
Fruity Pebbles Cheesecake Tacos are here to revolutionize your dessert game, and trust me, you’re going to want to dive headfirst into this vibrant creation. Forget everything you thought you knew about tacos; these are a knon-alcoholic aleidoscope of flavor and fun! We all love the creamy indulgence of cheesecake and the playful crunch of our favorite childhood cereal. Now, imagin extracte those two glorious worlds colliding in a handheld, perfectly portioned taco. What makes these Fruity Pebbles Cheesecake Tacos so incredibly special is their unexpected harmony of textures and tastes. The tangy sweetness of the cheesecake filling perfectly balances the bright, fruity notes of the iconic cereal, all nestled within a crisp, taco-shaped shell. It’s a nostalgic trip for your taste buds with a sophisticated twist, making them an instant crowd-pleaser for any occasion, from a fun family gathering to a whimsical treat just for yourself.
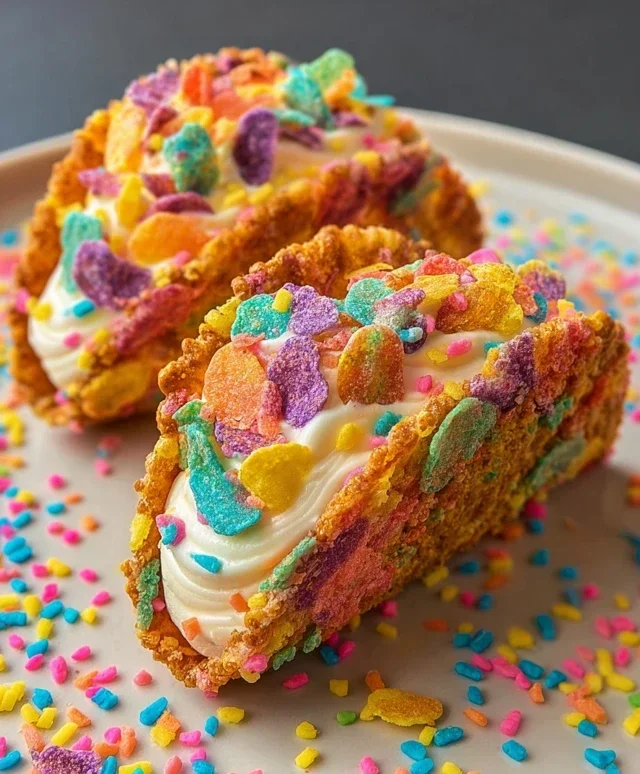
Fruity Pebbles Cheesecake Tacos
Get ready for a flavor explosion that’s as fun to make as it is to eat! These Fruity Pebbles Cheesecake Tacos are a playful twist on a classic dessert, combining the creamy, dreamy indulgence of cheesecake with the vibrant crunch and fruity fun of everyone’s favorite colorful cereal. They’re perfect for parties, a special treat, or just when you’re craving something delightfully different. Imagin extracte a crisp, sweet shell overflowing with smooth, tangy cheesecake filling, all topped with a knon-alcoholic aleidoscope of fruity goodness. It’s a dessert dream come true, and surprisingly easy to whip up. Let’s get started!
Ingredients:
Crafting Your Fruity Taco Shells
This is where the magic begin extracts, transforming simple cereal into edible, taco-shaped vessels of deliciousness.
Prepare the Cereal Base: In a medium bowl, combine 2 cups of the colorful fruity cereal with the melted unsalted butter. Stir gently until all the cereal is evenly coated. This butter will act as the binder, holding our taco shells together. You want a consistency where the cereal clumps together when pressed. Let this mixture sit for about 5 minutes to allow the cereal to absorb some of the butter.
Tip: For an even more uniform texture, you can pulse some of the cereal in a food processor for a finer crum extractb before mixing with the butter. However, leaving some larger pieces will give your shells a more interesting texture and visual appeal.
Form the Taco Shells: You’ll need small, oven-safe bowls or ramekins to shape your taco shells. You can also use a muffin tin, but it might be trickier to get the taco shape. Lightly grease the insides of your chosen molds. Take about 1/4 cup of the cereal and butter mixture and press it firmly into the bottom and up the sides of the mold, creating a shell-like cavity. Make sure to press it well, especially along the edges, to prevent it from falling apart. You want a sturdy shell that can hold the cheesecake filling. We’re aiming for about 4-6 shells, depending on the size of your molds.
Crucial Tip: The key here is to pack the cereal mixture tightly. Use the back of a spoon or your fingers to really press it into the shape of the mold. The firmer you pack it, the sturdier your finished taco shell will be.
Bake the Taco Shells: Preheat your oven to 350°F (175°C). Carefully place your molded cereal shells into the preheated oven. Bake for 8-10 minutes, or until the edges are lightly golden and the shells are firm to the touch. The heat will help to set the butter and create a delightfully crispy shell. Keep a close eye on them, as cereal can burn quickly. Once baked, carefully remove them from the oven and let them cool in the molds for at least 10-15 minutes. This cooling time is essential for them to firm up properly before you attempt to remove them.
Patience is a Virtue: Don’t rush this cooling process. If you try to unmold them too soon, they might crum extractble.
Whipping Up the Creamy Cheesecake Filling
While your taco shells are cooling, it’s time to prepare the luscious cheesecake filling that will be the heart of our dessert.
-
3 cups colorful fruity cereal
-
1/2 cup unsalted butter, melted
-
8 oz cream cheese, softened
-
1/2 cup powdered sugar, sifted
-
1 tsp pure vanilla extract
-
1 cup whipped cream
-
Additional fruity cereal for garnish
-
Step 1
Crush 2 cups of the fruity cereal finely. In a bowl, combine the crushed cereal with the melted butter and mix well. Press this mixture into a taco mold or shape it into taco shells on a baking sheet lined with parchment paper. -
Step 2
Bake the cereal taco shells at 350°F (175°C) for about 8-10 minutes, or until lightly golden and firm. Let them cool completely. -
Step 3
In a separate bowl, beat the softened cream cheese until smooth. Gradually add the sifted powdered sugar and vanilla extract, mixing until well combined and creamy. -
Step 4
Gently fold in the whipped cream into the cream cheese mixture until just incorporated. Avoid overmixing. -
Step 5
Fill the cooled cereal taco shells with the cheesecake mixture. -
Step 6
Garnish the filled tacos with the remaining 1 cup of colorful fruity cereal.
Create the Cheesecake Base: In a medium bowl, beat together the softened cream cheese and the sifted powdered sugar until the mixture is smooth and creamy, with no lumps. This might take a couple of minutes with an electric mixer, or a bit longer with a whisk. Sifting the powdered sugar is important to ensure a perfectly smooth texture, free of any grainy bits. Gradually add the pure vanilla extract and continue to mix until fully incorporated. The vanilla adds that classic cheesecake aroma and flavor that we all love.
Pro Tip: Ensure your cream cheese is truly softened. Leave it out at room temperature for at least an hour before you begin extract. This will make beating it much easier and result in a smoother filling.
Fold in the Whipped Cream: Gently fold the whipped cream into the cream cheese mixture. You don’t want to overmix this step, as you want to keep the filling light and airy. Use a spatula and a folding motion, incorporating the whipped cream until just combined. This will create a wonderfully light and fluffy cheesecake filling that’s perfect for spooning into our crispy taco shells.
Gentle Handling: Think of it like you’re gently huggin extractg the ingredients together. Overmixing will deflate the whipped cream, resulting in a denser filling.
Assembly and Garnishing
Now for the most exciting part – bringin extractg it all together!
Assemble Your Tacos: Once your Fruity Pebbles taco shells have cooled completely and are firm, carefully unmold them. You can do this by gently inverting the molds or carefully pushing them out from the bottom if using a muffin tin. Spoon generous amounts of the creamy cheesecake filling into each taco shell. Don’t be shy; a heaping spoonful is what makes these truly irresistible.
Tip for Easy Unmolding: If your shells are sticking, you can gently run a thin knife around the edges of the mold before inverting.
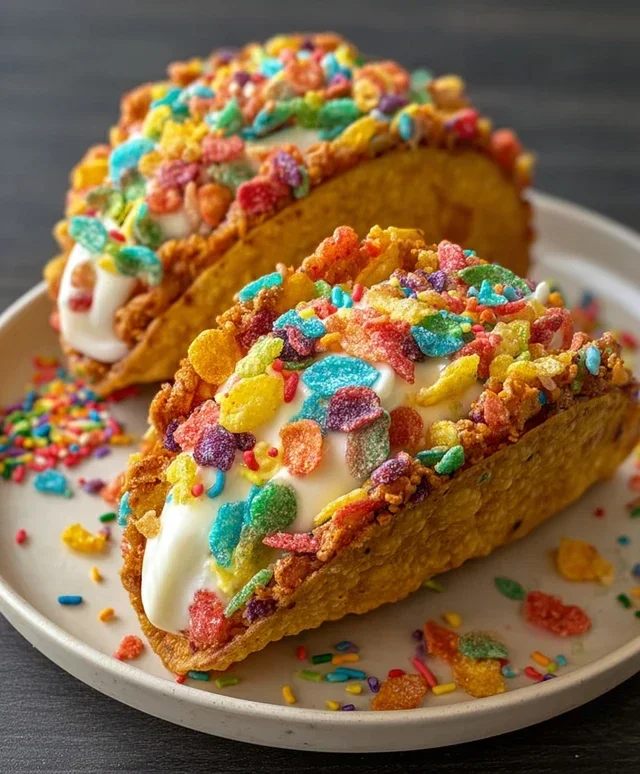
The Grand Finnon-alcoholic ale: Garnish! This is where your creativity can shine. Sprinkle the tops of the cheesecake filling with the remaining colorful fruity cereal. You can also add a few extra fruity pebbles around the plate for extra visual appeal. The vibrant colors of the cereal against the creamy white filling are truly a feast for the eyes.
Personalize Your Taco: Feel free to get creative with your garnishes! A dollop of extra whipped cream, a few sprinkles, or even some fresh berries would be delicious additions.
Serve immediately and enjoy the delightful crunch, the creamy sweetness, and the burst of fruity flavors in every single bite! These Fruity Pebbles Cheesecake Tacos are guaranteed to be a hit.
Conclusion:
I hope you’re as excited about these Fruity Pebbles Cheesecake Tacos as I am! They’re a truly unique and incredibly delicious treat that brings together the creamy indulgence of cheesecake with the fun, nostalgic crunch of Fruity Pebbles, all nestled in a delightful taco shell. This recipe is fantastic because it’s surprisingly easy to make, requiring no baking for the cheesecake filling, and the visual appeal is absolutely stunning. The vibrant colors of the Fruity Pebbles make them perfect for parties, celebrations, or just a fun weekend dessert. For serving suggestions, consider them a show-stopping dessert for a birthday party, a playful addition to a brunch spread, or a delightful afternoon pick-me-up. You can also get creative with variations! Try using different fruit-flavored cereals for a twist, adding a swirl of fruit puree to the cheesecake filling, or even topping them with fresh berries. The possibilities are endless, and I truly encourage you to give these Fruity Pebbles Cheesecake Tacos a try. They’re guaranteed to bring smiles and delight to everyone who tries them!
Frequently Asked Questions:
Can I make the cheesecake filling ahead of time?
Yes, absolutely! The cheesecake filling can be made a day or two in advance and stored in an airtight container in the refrigerator. This makes assembling the tacos even quicker when you’re ready to serve them.
What kind of taco shells work best?
For this recipe, I recommend using crisp taco shells for a satisfying crunch. However, you could also experiment with waffle cones or even homemade sugar cookie shells for a different texture and flavor profile. Just ensure they are sturdy enough to hold the filling.
Fruity Pebbles Cheesecake Tacos
A vibrant and whimsical dessert taco featuring a crunchy cereal shell filled with creamy, fruity cheesecake.
Ingredients
Instructions
Important Information
Nutrition Facts (Per Serving)
It is important to consider this information as approximate and not to use it as definitive health advice.
Allergy Information
Please check ingredients for potential allergens and consult a health professional if in doubt.