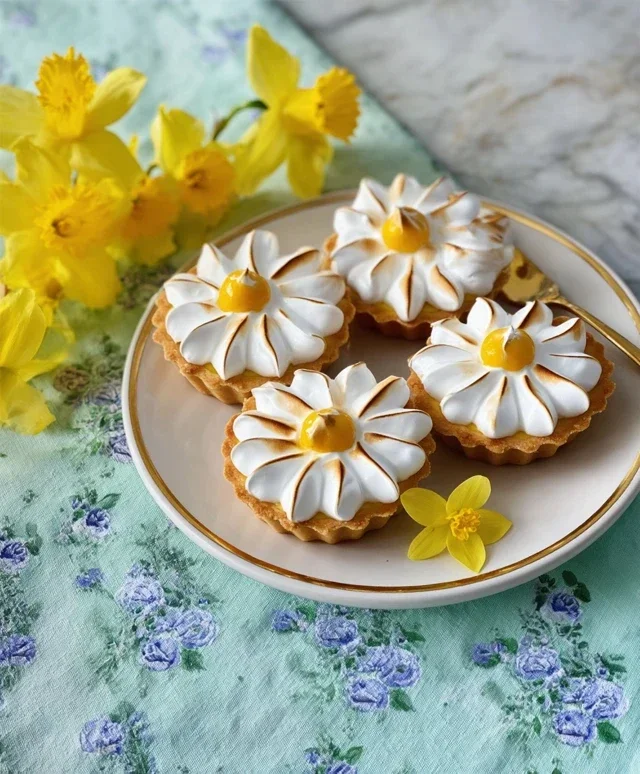
Daisy Lemon Meringue Pie-Sweet Tart Perfection
Daisy Lemon Meringue Pies are more than just a dessert; they’re a sunshiny hug in every bite. Imagin extracte a crisp, buttery crust cradling a creamy, tart lemon filling, all crowned with a cloud of sweet, toasted meringue. It’s a classic for a reason! People adore Daisy Lemon Meringue Pies for their irresistible combination of textures and flavors – that sharp citrus zest cutting through the sugary sweetness is pure perfection. What makes these pies truly special is the delightful contrast: the airy, light meringue against the smooth, tangy custard, creating a symphony for your taste buds. I’ve always been drawn to the sheer elegance and comforting familiarity of a well-made lemon meringue pie, and this particular recipe truly shines, bringin extractg out the best in every component.

Daisy Lemon Meringue Pies
There’s something undeniably cheerful about a lemon meringue pie. The vibrant yellow filling, the fluffy cloud of meringue – it’s a classic for a reason. And for those special occasions, or simply when you want to impress, a miniature version, our Daisy Lemon Meringue Pies, takes things to the next level of adorable. These individual pies are perfect for parties, afternoon tea, or just a delightful treat for yourself. The crisp, buttery pastry shell cradles a zesty, tangy lemon curd, all crowned with a sweet, light-as-air meringue. Let’s get baking!
Ingredients:
Making the Daisy Pastry Shells
This is where our journey begin extracts, creating the perfect foundation for our delightful pies. We’re making a sweet shortcrust pastry, which will be wonderfully crisp and slightly crum extractbly, a perfect contrast to the smooth lemon filling.
1. In a medium bowl, combine the 125g of plain flour and 35g of icing sugar. Give them a good whisk together to ensure they are evenly distributed. This will prevent pockets of unsweetened flour or overly sweet spots in your pastry.
2. Add the 60g of cold unsalted butter, cut into small cubes. Now, using your fingertips, rub the butter into the flour mixture until it resembles fine breadcrum extractbs. This process is crucial for a tender pastry; the cold butter creates little pockets of fat that will steam and expand during baking, resulting in that desirable flakiness. You want to work quickly here to keep the butter as cold as possible. Avoid overworking the dough, as this can develop the gluten too much and make the pastry tough.
3. In a small cup, lightly beat the 1 large egg yolk with 1 tablespoon of water. Make a well in the centre of your flour and butter mixture and pour in the egg yolk mixture.
4. Using a knife or a spatula, gently bring the mixture together to form a dough. Be careful not to knead it. Once it just starts to come together, lightly flour a surface and bring it together with your hands to form a cohesive ball. If it feels too dry, you can add a tiny splash more cold water, but only a teaspoon at a time.
5. Wrap the dough in cling film and chill in the refrigerator for at least 30 minutes. This chilling period is vital as it allows the gluten to relax and the fat to firm up, making the dough much easier to roll out and preventing it from shrinking too much during baking. Once chilled, you can roll it out to about 3-4mm thickness and cut out circles to fit your tartlet tins or muffin tin cups. Prick the bases with a fork, line with baking parchment and baking beans (or dried pulses), and blind bake at 180°C (160°C fan/Gas Mark 4) for about 15 minutes. Remove the parchment and beans and bake for a further 5-10 minutes until lightly golden. Let them cool completely.
Crafting the Zesty Lemon Filling
Now for the star of the show – that vibrant, tangy lemon curd! This filling is both incredibly simple and wonderfully rich.
1. In a heatproof bowl set over a pan of gently simmering water (a bain-marie), whisk together the 3 egg yolks (reserved from separating your eggs earlier) and 150g of caster sugar until well combined. Ensure the water isn’t boiling vigorously, as this can scramble the eggs.
2. Add the 60g of unsalted butter, cut into small cubes, to the bowl. Stir gently until the butter has melted and is fully incorporated into the egg and sugar mixture.
3. Gradually whisk in the 120ml of fresh lemon juice and the zest of 1 lemon. Continue to stir the mixture constantly over the simmering water. This is important to ensure even cooking and to prevent the mixture from catching on the bottom of the bowl.
4. Cook the lemon curd, stirring continuously, until it thickens to a consistency that coats the back of a spoon. This usually takes about 8-10 minutes. Don’t be tempted to rush this step; a gentle, slow cook will result in a smoother, richer curd. Once thickened, remove the bowl from the heat and let the lemon filling cool slightly.
5. Pour the cooled lemon filling into your pre-baked and cooled daisy pastry shells, filling them almost to the brim.
Whipping up the Dreamy Meringue
The final flourish! A beautiful, glossy meringue that bakes up to a delicate crisp on the outside and remains wonderfully soft within.
1. Ensure your bowl and whisk are scrupulously clean and free from any grease. Any trace of fat can prevent the egg whites from whipping up properly.
2. In a clean bowl, whisk the 3 large egg whites until they form soft peaks. This means when you lift the whisk, the peaks will curl over.
3. Gradually add the 150g of caster sugar, a tablespoon at a time, while continuing to whisk. Keep whisking until the meringue is thick, glossy, and the sugar has completely dissolved. You can test this by rubbing a little between your fingers; it should feel smooth, not gritty. This process is called the Swiss meringue method and results in a stable, beautiful meringue.
4. Spoon or pipe generous dollops of the meringue onto the lemon filling in each pastry shell. You can create swirls and peaks with the back of a spoon or use a piping bag for a more decorative effect. Ensure the meringue covers the filling completely, sealing the edges of the pastry to prevent the meringue from shrinking away during baking.
5. Bake the pies in a preheated oven at 170°C (150°C fan/Gas Mark 3) for about 12-15 minutes, or until the meringue is lightly golden brown. Keep a close eye on them, as meringues can brown quite quickly.
6. Remove the Daisy Lemon Meringue Pies from the oven and let them cool completely on a wire rack before serving. The contrast between the warm, zesty filling and the sweet, airy meringue is simply divine. Enjoy your little taste of sunshine!
Conclusion:
I truly hope you’ve enjoyed exploring the delightful world of Daisy Lemon Meringue Pies with me! This recipe is a triumph of textures and flavors, offering a bright, tangy lemon curd nestled in a crisp, buttery crust, all crowned with a cloud of sweet, airy meringue. It’s the perfect balance of sweet and tart, making it an irresistible treat for any occasion. Imagin extracte the smiles when you present this beautiful dessert at your next gathering or as a special weekend indulgence. Its impressive appearance belies its manageable steps, making it a rewarding bake for both novice and experienced bakers.
For serving, I love to serve this Daisy Lemon Meringue Pie chilled, perhaps with a few fresh raspberries or a sprig of mint for an extra pop of color and freshness. If you’re feeling adventurous, consider variations! You could add a touch of limoncello to the lemon curd for an adult twist, or experiment with different citrus fruits like lime or grapefruit for a unique flavor profile. Don’t be afraid to get creative with your meringue topping – perhaps a brûléed finish for added depth? I wholeheartedly encourage you to give this Daisy Lemon Meringue Pie recipe a try. It’s a classic for a reason, and I’m confident you’ll fall in love with its charm and deliciousness!
Frequently Asked Questions:
Can I make the lemon curd and crust ahead of time?
Absolutely! The lemon curd can be made up to two days in advance and stored in an airtight container in the refrigerator. The pie crust can also be baked ahead and stored at room temperature once completely cooled. This makes assembling the pie on the day of serving much quicker and less stressful.
My meringue is weeping. What did I do wrong?
Meringue weeping is often caused by undercooking or a high humidity environment. Ensure your meringue is cooked thoroughly until the peaks are stiff and glossy. Also, try to bake the pie in a dry environment. Once the meringue is baked, it’s best to serve the pie relatively soon after cooling to prevent this issue.
What’s the best way to store leftover Daisy Lemon Meringue Pie?
Leftover pie should be refrigerated. It’s best to cover it loosely to prevent the meringue from becoming too sticky. While it’s delicious the next day, the meringue is at its peak fluffiness when freshly made. You can gently reheat individual slices in a low oven for a few minutes to revive the crust, but be cautious not to overcook the meringue.
Daisy Lemon Meringue Pies
Individual lemon meringue pies with a buttery shortcrust pastry and a zesty lemon filling topped with fluffy meringue. Perfect for a delightful dessert.
Ingredients
-
125g plain flour
-
35g icing sugar
-
60g cold unsalted butter
-
1 large egg yolk
-
1 tbsp water
-
For the Lemon Filling:
-
150g caster sugar
-
40g cornflour
-
2 large egg yolks
-
200ml water
-
60ml fresh lemon juice
-
1 tsp lemon zest
-
For the Meringue:
-
2 large egg whites
-
100g caster sugar
Instructions
-
Step 1
For the pastry, rub the flour and icing sugar into the cold butter until it resembles breadcrumbs. Mix in the egg yolk and water to form a firm dough. Wrap and chill for 30 minutes. -
Step 2
Preheat your oven to 190°C (170°C fan/Gas Mark 5). Roll out the pastry and line 4 individual pie dishes. Prick the bases with a fork and blind bake for 15 minutes. Remove the baking beans and bake for another 5 minutes until lightly golden. -
Step 3
For the lemon filling, whisk together the caster sugar and cornflour in a saucepan. Gradually whisk in the egg yolks and water. Cook over a medium heat, stirring constantly, until thickened. Remove from heat and stir in lemon juice and zest. -
Step 4
Pour the lemon filling into the pre-baked pastry cases. For the meringue, whisk the egg whites until stiff peaks form. Gradually add the caster sugar, whisking continuously until glossy. -
Step 5
Spoon or pipe the meringue over the lemon filling, ensuring it covers the edges to seal. Bake in the preheated oven at 180°C (160°C fan/Gas Mark 4) for 10-15 minutes, or until the meringue is golden brown. -
Step 6
Allow the pies to cool completely before serving. This will help the filling to set properly.
Important Information
Nutrition Facts (Per Serving)
It is important to consider this information as approximate and not to use it as definitive health advice.
Allergy Information
Please check ingredients for potential allergens and consult a health professional if in doubt.