Tri Tip Two Ways – Delicious & Easy Recipes
Tri Tip, that remarkably versatile and incredibly flavorful cut of beef, has truly captured the hearts (and taste buds!) of grill masters and home cooks alike. If you’re like me, you’ve probably experienced the sheer joy of sinking your teeth into a perfectly cooked tri tip – tender, juicy, with a beautiful crust that whispers tnon-alcoholic ales of smoky goodness. What is it about this triangular treasure that makes it so universally loved? It’s its inherent ability to soak up marinades and seasonings, its satisfying chew, and that distinct, beefy richness that always hits the spot. But the magic doesn’t stop at one preparation. Today, I’m thrilled to share with you not one, but two fantastic ways to prepare tri tip, each offering a unique and unforgettable culinary adventure.
Discover Your Favorite Tri Tip Preparation
Get Ready for Deliciousness!
Tri Tip (2 Ways)
Tri tip is one of those cuts of beef that truly deserves its moment in the spotlight. It’s incredibly flavorful, relatively affordable, and surprisingly versatile. This triangular muscle from the bottom sirloin has a wonderful balance of tenderness and beefy richness. Today, we’re going to explore two fantastic ways to prepare a beautiful tri tip roast, ensuring you get a perfectly cooked, juicy, and delicious result every time. Whether you’re a grilling enthusiast or prefer the controlled environment of your oven, these methods will deliver.
Ingredients:
Method 1: The Classic Grill
Grilling is, in my opinion, the ultimate way to cook a tri tip. The high heat and smoky char add an incredible depth of flavor that’s hard to replicate. We’ll aim for a beautiful crust on the outside and a perfectly medium-rare interior.
Step 1: Preparation is Key
Before we even think about heat, let’s get our tri tip ready. For this method, it’s best to let the roast sit at room temperature for about 30-60 minutes. This helps it cook more evenly. Pat the roast completely dry with paper towels. This is a crucial step for developing a good sear. In a small bowl, combine the garlic salt, Lawry’s seasoning salt, kosher salt, black pepper, sugar, garlic powder, and dried parsley. This is our all-purpose tri tip rub, a classic for a reason. Now, drizzle the olive oil all over the tri tip, ensuring it’s lightly coated. Then, generously sprinkle the rub all over the roast, pressing it in gently to adhere. Make sure to get all sides.
Step 2: Preheating the Grill
For this grilling method, we’re going to use a two-zone heat setup. This means you’ll have one side of your grill that is very hot (direct heat) and another side that is cooler (indirect heat). Preheat your grill to high heat, aiming for an internal temperature of around 450-500°F. Once it’s hot, push all the coals to one side, or turn off the burners on one side if you’re using a gas grill. This is where we’ll sear our roast.
Step 3: The Sear and Smoke
Place the seasoned tri tip directly over the hottest part of the grill. We want to get a beautiful, dark crust on all sides. Sear each side for about 2-3 minutes, turning with tongs. You’ll see some beautiful charring developing. Don’t be afraid of a little smoke; that’s where the flavor is! Once all sides have a nice sear, move the tri tip to the cooler side of the grill, away from the direct heat. Close the lid.
Step 4: The Indirect Cook and Temperature Check
This is where the magic happens and the roast finishes cooking gently. We’re looking for an internal temperature. For medium-rare, aim for 125-130°F. For medium, 130-135°F. Use a reliable meat thermometer inserted into the thickest part of the roast. It will take approximately 15-25 minutes on the indirect heat, depending on your grill’s temperature and the thickness of your roast. Periodically check the temperature. Don’t be tempted to open the lid too often, as this will let out the heat.
Step 5: Rest and Slice
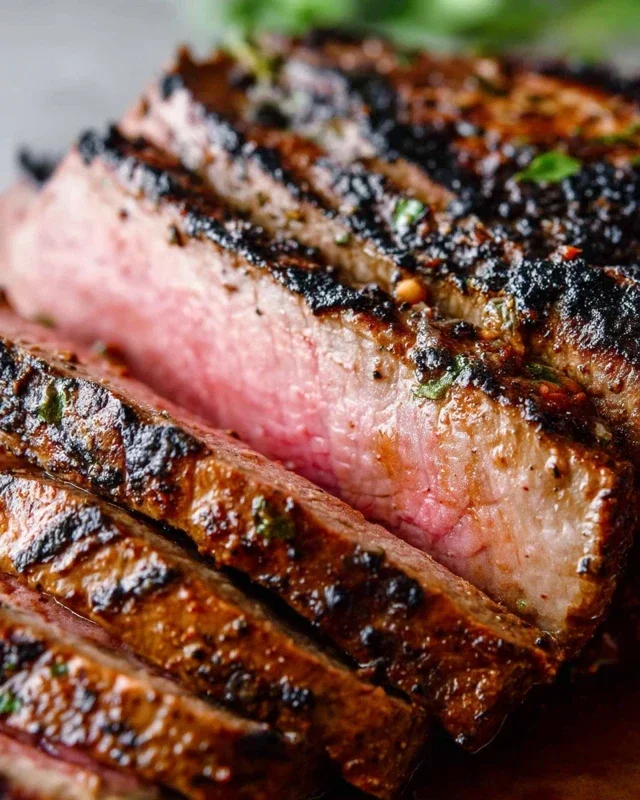
Once your tri tip reaches your desired internal temperature, remove it from the grill and place it on a clean cutting board. This is arguably the most important step for a juicy roast. Tent it loosely with aluminum foil and let it rest for at least 10-15 minutes. This allows the juices to redistribute throughout the meat, resulting in a tender and moist bite. After resting, slice the tri tip against the grain. You’ll notice the grain runs in a particular direction; slicing perpendicular to it is key for tenderness.
Method 2: The Oven Roast
If grilling isn’t an option or you prefer a more controlled environment, the oven is a fantastic way to prepare tri tip. This method often involves a sear first, either on the stovetop or in a hot oven, followed by a gentler roast.
Step 1: Oven Prep and Sear
Preheat your oven to 450°F. While the oven heats, prepare your tri tip just as you did for the grilling method: pat dry, coat with olive oil, and generously apply the rub. You have two options for searing here. You can either place the roast in a screaming hot, oven-safe skillet (cast iron is perfect) for a few minutes per side until browned, or you can place it directly on the oven rack for the initial blast of heat.
Step 2: The Initial High-Heat Roast
If you seared on the stovetop, transfer the skillet to the preheated oven. If you’re searing in the oven, place the seasoned tri tip directly on the oven rack, with a baking sheet on the rack below to catch any drips. Roast at 450°F for about 10-15 minutes, or until you’ve achieved a nice brown crust.
Step 3: Lowering the Temperature for a Gentle Cook
After the initial high-heat sear, reduce the oven temperature to 300°F. This allows the roast to cook through gently without drying out the exterior. Continue to roast, checking the internal temperature regularly with a meat thermometer. For medium-rare, aim for 125-130°F. For medium, 130-135°F. This phase will take approximately 20-35 minutes, depending on the size and thickness of your roast.
Step 4: Monitoring and Achieving Perfect Doneness
It’s crucial to monitor the temperature closely in this stage. Unlike the grill, there’s no smoke to guide you, so the thermometer is your best friend. If the roast seems to be browning too quickly on the outside before reaching your desired internal temperature, you can loosely tent it with foil. The goal is to cook it evenly to your preferred doneness.
Step 5: The Essential Rest and Slice**
Just like with the grilled version, resting is non-negotiable for an oven-roasted tri tip. Once it reaches your target temperature, remove it from the oven and place it on a cutting board. Tent it loosely with foil and let it rest for at least 10-15 minutes. This allows the juices to settle, ensuring every slice is incredibly tender and moist. Slice against the grain, just as you would with the grilled tri tip, for maximum tenderness.
Both of these methods will yield a fantastic tri tip roast. The key is the rub, proper searing, careful temperature monitoring, and that all-important rest. Enjoy your perfectly cooked tri tip!

Conclusion:
So there you have it! Two fantastic ways to prepare a delicious and impressive Tri Tip roast, proving that this cut of beef is incredibly versatile and begin extractner-friendly. Whether you’re a seasoned grill master or just starting out in the kitchen, this recipe offers a fantastic opportunity to elevate your home cooking. The beauty of Tri Tip lies in its rich flavor and tender texture, making it a crowd-pleaser every time. We’ve covered a classic grilled approach and a flavorful oven-roasted method, giving you options to suit your equipment and mood.
For serving, this Tri Tip shines alongside roasted vegetables like asparagus or potatoes, a fresh salad, or even some crusty bread for soaking up those delicious juices. Don’t be afraid to experiment with your favorite marinades or rubs to put your own spin on this amazing cut of meat. The possibilities are truly endless! I encourage you to give one, or both, of these Tri Tip preparations a try. You might just discover your new go-to recipe!
Frequently Asked Questions:
What’s the best internal temperature for Tri Tip?
For a medium-rare Tri Tip, aim for an internal temperature of around 130-135°F (54-57°C). If you prefer it medium, go for 135-140°F (57-60°C). Remember that the temperature will rise a few degrees as it rests, so pull it off the heat slightly before it reaches your target.
Can I marinate Tri Tip ahead of time?
Absolutely! Marinating Tri Tip for at least 4 hours, or even overnight in the refrigerator, will infuse it with even more flavor and help tenderize it further. Just make sure to discard the marinade after use.
What if I don’t have a grill?
No problem at all! The oven-roasted method is perfectly delicious and requires no special equipment beyond a roasting pan and your oven. It’s a foolproof way to achieve a tender and juicy Tri Tip.
Tri Tip (2 Ways)
A versatile tri tip roast prepared with two distinct seasoning approaches, offering a flavorful and satisfying meal.
Ingredients
-
2 & 1/2 pound tri tip roast
-
1 & 1/2 teaspoons garlic salt
-
1 tablespoon Lawry’s seasoning salt
-
1 & 1/2 teaspoons kosher salt (Diamond Crystal)
-
1 teaspoon black pepper
-
1/2 teaspoon sugar
-
2 teaspoons garlic powder
-
1 tablespoon dried or fresh parsley
-
1/4 cup olive oil
Instructions
-
Step 1
Preheat oven to 400°F (200°C) or prepare grill for medium-high heat. -
Step 2
Divide tri tip roast in half. Season one half with garlic salt, black pepper, and parsley. Season the other half with Lawry’s seasoning salt, kosher salt, sugar, and garlic powder. -
Step 3
Rub olive oil evenly over both seasoned halves of the tri tip. -
Step 4
For oven: Place tri tip halves on a baking sheet. Roast for 30-40 minutes, or until internal temperature reaches desired doneness (130-135°F for medium-rare). -
Step 5
For grill: Sear tri tip halves over direct high heat for 3-4 minutes per side. Move to indirect heat and close lid. Grill for 20-30 minutes, or until internal temperature reaches desired doneness (130-135°F for medium-rare). -
Step 6
Remove tri tip from oven or grill and let rest for 10-15 minutes before slicing against the grain.
Important Information
Nutrition Facts (Per Serving)
It is important to consider this information as approximate and not to use it as definitive health advice.
Allergy Information
Please check ingredients for potential allergens and consult a health professional if in doubt.