Easy Mini Cannoli Cups- Delicious Italian Dessert
Mini Cannoli Cups are about to become your new favorite sweet indulgence. Who can resist the allure of these delightful little Italian pastries? We certainly can’t! The perfectly crisp, golden shell giving way to a lusciously creamy, sweet ricotta filling is a symphony of textures and flavors that has captivated taste buds for generations. What makes these mini cannoli cups so special? It’s their approachable size, making them ideal for parties, dessert buffets, or simply a guilt-free (okay, maybe slightly guilty) treat to enjoy with your afternoon coffee. Forget the hassle of traditional cannoli tubes; these simplified mini cannoli cups deliver all the authentic taste without the fuss, proving that sometimes, good things truly do come in small packages.
Mini Cannoli Cups
Are you craving the delightful crunch of a cannoli but don’t want the fuss of rolling and frying shells? Or perhaps you’re looking for a fun, bite-sized dessert that’s perfect for parties or a special treat? Then you’ve come to the right place! These Mini Cannoli Cups are a revelation. They capture all the irresistible flavor of classic cannoli – creamy, sweet ricotta filling with a hint of citrus and vanilla, all nestled in a crisp, golden crust – but with a wonderfully easy shortcut. Instead of traditional fried shells, we’re using store-bought pie crusts. This makes them incredibly accessible, even for begin extractner bakers. Imagin extracte the joy of serving these little gems, knowing they were surprisingly simple to make. They look elegant, taste divine, and are just the right size for indulgin extractg without overdoing it. Get ready to impress your friends and family with these charming and delicious Mini Cannoli Cups!
Ingredients:
Instructions:
Preparing the Ricotta Filling:
The heart of any cannoli is its luscious filling, and ours is no exception. The key to a fantastic ricotta filling is to ensure your ricotta is well-drained. This prevents a watery filling that can make your crusts soggy. To drain it effectively, you can either spoon the ricotta into a fine-mesh sieve lined with cheesecloth (or a coffee filter) and let it sit over a bowl in the refrigerator for at least an hour, or even better, overnight. Once drained, transfer the ricotta to a medium mixing bowl. Add the powdered sugar and granulated sugar. Using a spatula or an electric mixer on low speed, cream the ricotta and sugars together until smooth and well combined. You want a creamy, lump-free consistency. Next, gently fold in the finely grated orange or lemon zest – I find orange zest gives a lovely warmth, but lemon provides a brighter, more zesty flavor, so use whichever you prefer! Finally, stir in the vanilla extract. Give it a final mix to ensure everything is evenly distributed. Cover the bowl and refrigerate the filling while you prepare the crusts. This allows the flavors to meld beautifully.
Creating the Pie Crust Cups:
This is where the magic happens! Take your softened refrigerated pie crusts. Unroll them carefully onto a lightly floured surface. You want to work gently to avoid tearing. Using a round cookie cutter or the rim of a glass that is slightly larger than your muffin tin cups (around 3 to 3.5 inches in diameter), cut out circles from the pie crusts. You should aim to get as many circles as possible from each crust. You’ll likely have some scraps, and that’s okay! You can gently re-roll them once to cut out more circles, but be careful not to overwork the dough. Preheat your oven to 375°F (190°C). Lightly grease a standard 12-cup muffin tin. Gently press one pie crust circle into each muffin cup, allowing the edges to naturally crimp and extend slightly above the rim. Don’t worry if it’s not perfectly smooth; a little rustic charm is part of the appeal. Use a fork to lightly prick the bottom of each crust in a few places. This helps prevent the crust from puffing up too much as it bakes.
Baking the Cups to Golden Perfection:
Now it’s time to bake our little cups! Place the muffin tin in the preheated oven. Bake for approximately 12-15 minutes, or until the edges of the pie crusts are golden brown and slightly crisp. Keep a close eye on them, as oven temperatures can vary, and you don’t want them to burn. Once they’re beautifully golden, carefully remove the muffin tin from the oven. Let the crusts cool in the muffin tin for about 5-10 minutes. This allows them to firm up a bit. Then, carefully invert the muffin tin onto a wire rack and gently lift out the baked cannoli cups. You may need to use a small offset spatula or a butter knife to help loosen them if they’re sticking a little. Place them upright on the wire rack and let them cool completely. It’s crucial that they are fully cooled before filling, otherwise, the heat will melt the ricotta.
Crafting the Cinnamon-Sugar Coating:
While our cups are cooling, let’s prepare the delightful crunchy topping. In a small shallow dish or plate, combine the turbinado sugar and ground cinnamon. Stir them together well until the cinnamon is evenly distributed throughout the sugar. This mixture will be used to coat the outer edges of our mini cannoli cups, adding another layer of texture and flavor that is reminiscent of traditional cannoli. Once the baked cups have cooled completely, it’s time to give them their signature coating. Carefully dip the top rim of each cooled pie crust cup into the cinnamon-sugar mixture, pressing gently to ensure the sugar adheres. You can also sprinkle the mixture onto the edges if dipping feels too messy. This adds a lovely visual appeal and a delightful crunch.
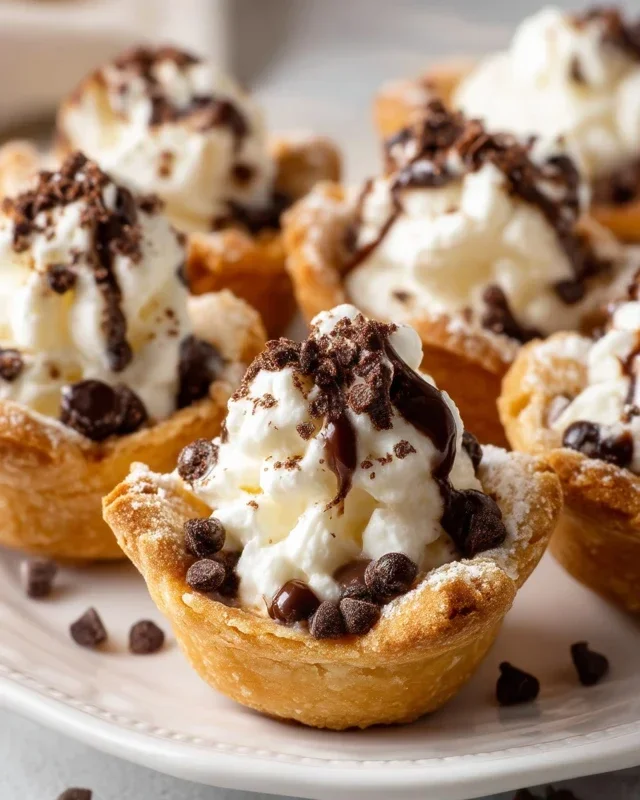
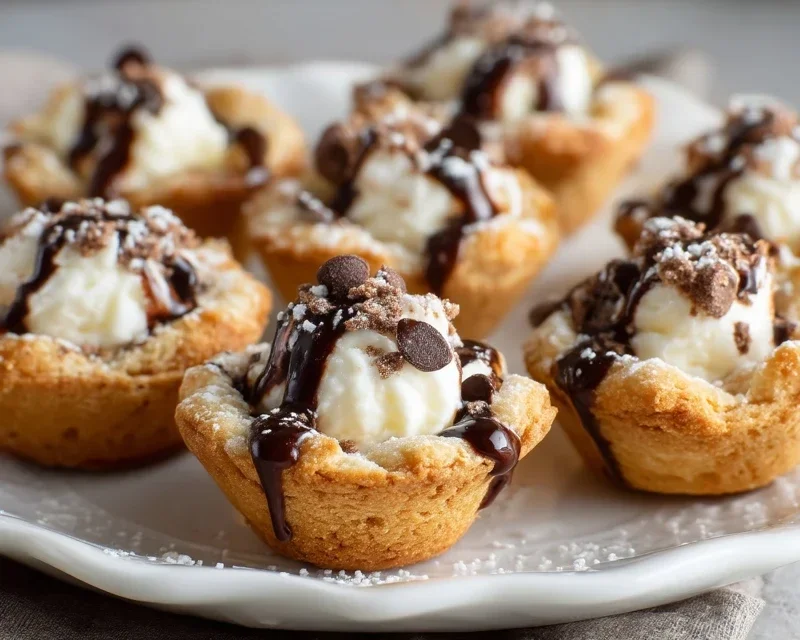
Assembling Your Mini Cannoli Cups:
The grand finnon-alcoholic ale! Once your pie crust cups are completely cool and coated, it’s time to fill them with that dreamy ricotta mixture. Retrieve your chilled ricotta filling from the refrigerator. Spoon or pipe the filling into each cooled cannoli cup. A piping bag with a plain tip makes for a neater presentation, but a spoon works perfectly well too. Don’t overfill them; you want the filling to sit nicely within the crust. Finally, it’s time for the finishing touches. Sprinkle the miniature semisweet chocolate chips or finely chopped pistachios over the top of the ricotta filling. These add a delightful burst of flavor and color. For that final, elegant touch, dust the tops of your Mini Cannoli Cups with a little extra powdered sugar, just like you see on traditional cannoli. Serve immediately and enjoy the delightful symphony of textures and flavors!
Conclusion:
And there you have it – a simple yet incredibly satisfying way to enjoy the classic taste of cannoli without the fuss! These mini cannoli cups are a true triumph of deliciousness and ease, offering all the delightful creaminess and crunch of traditional cannoli in a perfectly portioned, no-fuss package. They’re ideal for parties, sweet treats, or anytime you’re craving something special. The crispy phyllo shells, when baked to golden perfection, provide a wonderful contrast to the rich, sweet ricotta filling. I’ve found they’re fantastic served simply as is, but also love drizzling them with a little extra chocolate sauce or dusting them with powdered sugar for an added touch of elegance. Feel free to experiment with the filling too – a hint of espresso powder or finely chopped pistachios can add another layer of flavor.
I truly encourage you to give these mini cannoli cups a try. They’re a fantastic project for bakers of all levels, and the joy on people’s faces when they bite into one is absolutely worth it. So gather your ingredients and get ready to impress yourself and your loved ones with this delightful dessert!
Frequently Asked Questions:
Can I make the filling ahead of time?
Yes, absolutely! You can prepare the ricotta filling up to 24 hours in advance. Just keep it tightly covered in the refrigerator. It’s best to fill the phyllo shells just before serving to ensure they stay crispy.
How should I store leftover mini cannoli cups?
For the best texture, it’s ideal to store the unfilled phyllo shells and the filling separately in airtight containers in the refrigerator. If you have already filled the cups, they will be best enjoyed within a few hours, as the shells will soften over time.
What other toppings work well with mini cannoli cups?
Oh, the possibilities are endless! Beyond chocolate drizzle and powdered sugar, consider a sprinkle of finely chopped candied orange peel for a citrusy zing, mini chocolate chips stirred into the filling, or even a dusting of cinnamon for a warm spice note. You could also get creative with fruit purees or a dollop of whipped cream!
Mini Cannoli Cups
Enjoy the classic flavors of cannoli in an easy-to-make, bite-sized cup.
Ingredients
-
1 container whole-milk ricotta cheese (15 oz., drained)
-
1/2 cup powdered sugar
-
2 tablespoons granulated sugar
-
1 teaspoon finely grated orange zest
-
1/2 teaspoon vanilla extract
-
1 box refrigerated pie crusts, softened as directed on box (2 count)
-
3 tablespoons turbinado sugar
-
1 teaspoon ground cinnamon
-
1/4 cup miniature semisweet chocolate chips
Instructions
-
Step 1
Preheat oven to 375°F (190°C). Lightly grease a mini muffin tin. -
Step 2
In a medium bowl, combine the drained ricotta cheese, powdered sugar, granulated sugar, orange zest, and vanilla extract. Stir until well combined and smooth. -
Step 3
Unroll the refrigerated pie crusts. Cut each crust into 4 equal squares. Press each square into the cups of the mini muffin tin, forming a shell. -
Step 4
Bake for 12-15 minutes, or until the crusts are golden brown and crisp. -
Step 5
While the crusts are baking, in a small bowl, mix together the turbinado sugar and ground cinnamon. -
Step 6
Once the crusts are baked, let them cool in the tin for a few minutes before carefully removing them to a wire rack to cool completely. -
Step 7
Fill the cooled cannoli cups with the ricotta mixture. Sprinkle with miniature chocolate chips. -
Step 8
Dust with additional powdered sugar before serving, if desired.
Important Information
Nutrition Facts (Per Serving)
It is important to consider this information as approximate and not to use it as definitive health advice.
Allergy Information
Please check ingredients for potential allergens and consult a health professional if in doubt.