Frozen Candy Grapes Jell-O Recipe-Easy Treat
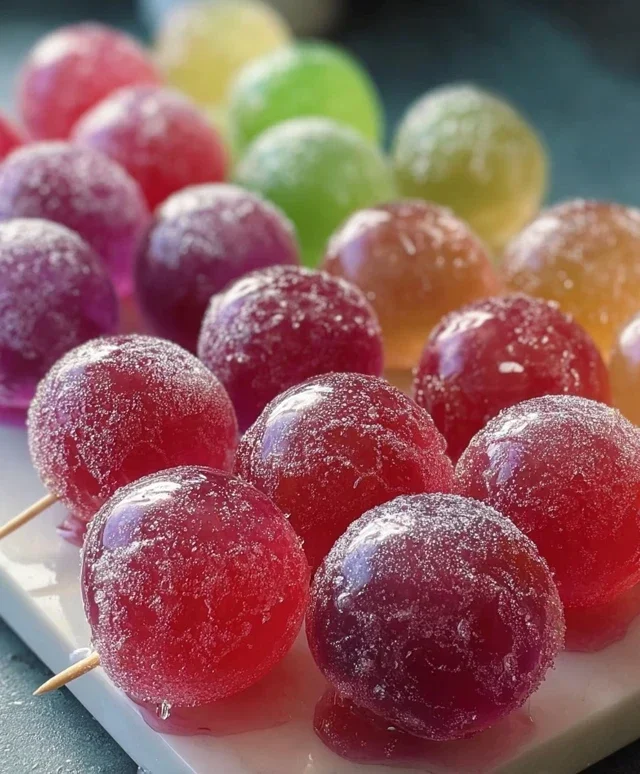
Frozen Candy Grapes with Jell-O are about to become your new favorite obsession. Imagin extracte biting into a perfectly chilled grape, bursting with sweet, fruity flavor, and then that delightful, jiggly surprise of vibrant Jell-O. It’s a textural and tastebud adventure that’s surprisingly simple to create. This isn’t just any frozen treat; it’s a nostalgic nod to childhood fun, elevated with a sophisticated twist. People absolutely adore these treats because they offer an instant burst of cool refreshment on a hot day, and the combination of crisp grape and smooth Jell-O is undeniably addictive. What truly sets Frozen Candy Grapes with Jell-O apart is their playful presentation and the customizable nature of the Jell-O flavors, allowing you to match any mood or occasion. Get ready to experience a snack sensation that’s both incredibly easy and delightfully delicious!
Ready to Make Your Own Frozen Candy Grapes with Jell-O?
Let’s Dive In!
Frozen Candy Grapes with Jell-O
Get ready for a treat that’s as fun to make as it is to eat! These Frozen Candy Grapes with Jell-O are a vibrant, sweet, and slightly tangy explosion of flavor and texture. Imagin extracte biting into a cool, crisp grape, coated in a shell of sweet, fruity Jell-O that’s reminiscent of your favorite childhood candies. They’re perfect for a hot summer day, a fun party appetizer, or just a delightful snack when you’re craving something a little out of the ordinary. The beauty of this recipe lies in its simplicity and the sheer joy of its colorful presentation. We’re going to transform ordinary grapes into extraordinary frozen delights using a rainbow of Jell-O flavors and a hint of spice. Don’t be intimidated by the different Jell-O flavors; it’s all part of the fun and the way we create those signature “candy” coatings.
Ingredients:
Instructions:
Prepare Your Grapes: The first step is to get your grapes ready for their delicious makeover. Thoroughly wash your pound of grapes under cool running water. Gently rub them to remove any dust or residue. Once washed, pat them completely dry with a clean kitchen towel or paper towels. It’s crucial that the grapes are dry, as any moisture will prevent the Jell-O from adhering properly. Next, we’ll be inserting toothpicks. Take a toothpick and gently push it into the stem end of each grape. You want to insert it about halfway into the grape, ensuring it’s secure enough to hold the grape when you dip it. Leave the other end sticking out so you have a handle to work with. If your grapes are particularly large, you might need to be a bit more careful to avoid splitting them. Work in batches if necessary, and set your prepared grapes aside.
Make the Jell-O Coatings: Now for the colorful part! We’ll be preparing each Jell-O flavor separately. For each box of Jell-O, you’ll need to dissolve it in boiling water and then add cold water. The key here is to follow the package instructions for the most part, but we’re going to use slightly less water than typically recommended for a firmer coating that’s easier to dip. For each box of Jell-O, bring 1 cup of water to a boil. Once boiling, remove it from the heat and whisk in the dry Jell-O powder until it’s completely dissolved. Let this mixture sit for a minute or two to cool slightly. Then, stir in 1/2 cup of cold water. This reduced water ratio will give us a thicker Jell-O mixture, which is ideal for coating the grapes. Repeat this process for all six flavors: raspberry, berry blue, orange, lime, lemon, and grape. It’s helpful to use separate bowls or containers for each flavor, or to prepare them one at a time if you have limited space.
Chill the Jell-O Mixtures: Before we can dip our grapes, the Jell-O needs to thicken up significantly. This is a crucial step for achieving that candy-like shell. Once you’ve prepared each Jell-O mixture, place the containers in the refrigerator. You’ll want to chill them until they are partially set but still liquid enough to dip. Think of it like the consistency of honey or a thick syrup. This can take anywhere from 45 minutes to 1.5 hours, depending on your refrigerator’s temperature and the size of your containers. You’ll need to keep an eye on them and stir occasionally to prevent a skin from forming on top, especially as they start to gel. If one Jell-O flavor sets up faster than others, you can always gently warm it up for a few seconds in the microwave (being very careful not to overheat it) or let the others chill longer.
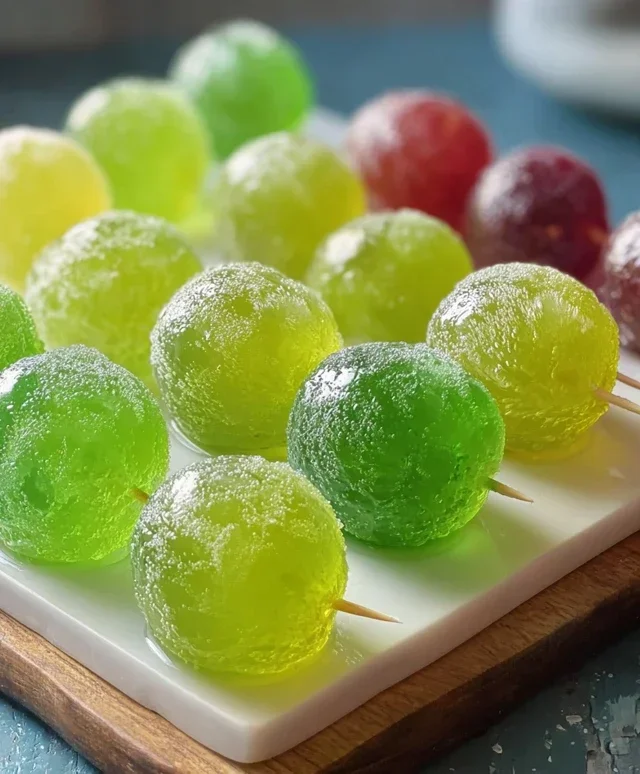
Dip and Freeze: With your Jell-O mixtures partially set and your grapes prepared, it’s time for the fun part – dipping! Working with one flavor of Jell-O at a time, take a prepared grape by its toothpick and carefully dip it into the thickened Jell-O. Swirl it around gently to ensure the entire grape is coated. You might need to use a spoon to help scoop some Jell-O over the grape if it’s being stubborn. Once coated, lift the grape out and let any excess Jell-O drip back into the bowl for a few seconds. You can gently scrape the bottom of the grape against the rim of the bowl to get a nice, even coating. Carefully place the dipped grape onto a baking sheet lined with parchment paper or wax paper. Make sure the grapes aren’t touching each other, as they will stick together. Once you have a tray full, place the baking sheet in the freezer. Repeat this dipping process with all your prepared grapes and the remaining Jell-O flavors. You can alternate colors for a beautiful rainbow effect.
The Final Freeze and Flavor Boost: After you’ve dipped and placed all your grapes on the baking sheet, it’s time for the final freeze. You’ll want to freeze these candy grapes until they are completely solid. This typically takes about 2-3 hours. The goal is for the Jell-O coating to be firm and almost crystalline, like a hard candy shell. Once they are frozen solid, you have the option to add an extra layer of flavor and excitement. You can lightly sprinkle some Tajín seasoning and/or chili powder over the frozen grapes. This adds a wonderfully complex sweet, tangy, and subtly spicy element that perfectly complements the fruity Jell-O and the cool grape. You can do this on a few grapes or all of them, depending on your preference. Once seasoned (or if you choose not to season them), transfer the frozen candy grapes to an airtight container or a freezer bag. Store them in the freezer until you’re ready to enjoy. They are best served directly from the freezer for that perfect icy crunch. Enjoy these vibrant, flavorful, and delightfully chewy frozen treats!
Conclusion:
And there you have it – the incredibly simple yet wonderfully satisfying recipe for Frozen Candy Grapes with Jell-O! I truly believe this recipe is a winner because it’s not only ridiculously easy to make, requiring minimal ingredients and effort, but the result is a delightful explosion of sweet, tangy, and cool flavors that feels like a treat. The combination of the juicy grape, the sweet Jell-O coating, and the icy crunch is simply irresistible, making it a perfect snack for any occasion. Whether you’re looking for a fun dessert for the kids, a refreshing pick-me-up on a hot day, or a unique appetizer to impress your guests, these frozen candy grapes deliver every time.
For serving, these are best enjoyed immediately after they’ve set. They’re fantastic on their own, but you could also serve them alongside a platter of other frozen fruit treats or as a playful garnish for ice cream or yogurt parfaits. Thinking about variations? Don’t hesitate to experiment! Try different Jell-O flavors to create a rainbow of colors and tastes. You could even mix in a tiny bit of citrus zest with the Jell-O for an extra zing. I highly encourage you to give this recipe a try; you won’t regret the simple joy it brings!
Frequently Asked Questions:
Can I use different types of grapes?
Absolutely! While green seedless grapes are fantastic for their tartness, red or black seedless grapes will also work beautifully. Just be aware that the color of the Jell-O might slightly blend with the grape color, creating interesting visual effects.
How long do these frozen candy grapes last?
For the best texture and flavor, it’s ideal to consume them within a few days of making. Store any leftovers in an airtight container in the freezer, but they might become a bit harder over time. They’re truly at their peak when freshly frozen.
Frozen Candy Grapes with Jell-O
A fun and flavorful frozen treat made with fresh grapes coated in colorful Jell-O and a hint of spice.
Ingredients
-
1 pound grapes (green, red, or mixed)
-
1 cup water
-
Toothpicks
-
1 box raspberry Jell-O
-
1 box berry blue Jell-O
-
1 box orange Jell-O
-
1 box lime Jell-O
-
1 box lemon Jell-O
-
1 box grape Jell-O
-
Tajín seasoning
-
Chili powder
Instructions
-
Step 1
Wash and thoroughly dry the grapes. Remove them from the stems. -
Step 2
Insert a toothpick into the stem end of each grape. -
Step 3
In separate small bowls, prepare each flavor of Jell-O according to package directions, using 1/4 cup of hot water and dissolving completely. Let cool slightly. -
Step 4
Dip each grape into a different color of Jell-O, ensuring it’s fully coated. Shake off any excess. -
Step 5
Place the coated grapes on a parchment-lined baking sheet, ensuring they don’t touch. -
Step 6
Freeze for at least 1-2 hours, or until firm. -
Step 7
Once frozen, lightly sprinkle with Tajín seasoning and chili powder, if desired.
Important Information
Nutrition Facts (Per Serving)
It is important to consider this information as approximate and not to use it as definitive health advice.
Allergy Information
Please check ingredients for potential allergens and consult a health professional if in doubt.