Jolly Rancher Candy Apples Recipe-Sweet & Crunchy Delight
Jolly Rancher Candy Apples are a dazzling burst of nostalgic flavor and vibrant color that instantly transports us back to carefree days. Who doesn’t remember the satisfying crunch and the intensely fruity punch of these iconic treats? There’s something incredibly special about a homemade Jolly Rancher Candy Apple. It’s not just about the candy coating; it’s the perfect balance of crisp apple tartness and that signature sweet, chewy Jolly Rancher magic. Whether you’re looking to recreate childhood memories or simply crave a show-stopping dessert that’s fun to make and even more fun to devour, these Jolly Rancher Candy Apples are guaranteed to be a hit. Get ready to add a playful pop of sweetness to your life with this irresistible recipe!
Jolly Rancher Candy Apples
Get ready to unleash your inner candy artisan with these dazzling Jolly Rancher Candy Apples! These vibrant treats are a nostalgic throwback with a dazzlingly modern twist, transforming simple apples into edible works of art. The classic crunch of an apple, combined with the intensely fruity, chewy shell of melted Jolly Ranchers, creates a flavor explosion that’s simply irresistible. Forget the plain caramel; this is a carnival in your mouth! Perfect for parties, holidays, or just a fun weekend activity, these candy apples are guaranteed to be a showstopper. We’re going to walk through each step together, so don’t worry if you’ve never made candy apples before. The secret is in controlling the temperature and working quickly, but I’ll guide you through it all.
Ingredients:
Preparing Your Apples
The first and arguably most crucial step is preparing your apples. You want them to be perfectly clean and dry for the candy coating to adhere properly. Start by washing your apples thoroughly under cool running water. You can use a soft brush to gently scrub away any dirt or residue. Once washed, pat them completely dry with paper towels. Any moisture will cause the candy coating to become sticky and less crisp. It’s also a good idea to remove the stems. You can do this by gently twisting and pulling them out. If the stems are stubborn, a gentle wiggle should do the trick. For a smoother surface, you can also remove the little woody nub at the very top where the stem was.
Getting Ready to Dip
Now for the magic! We need to get our Jolly Ranchers melted into a smooth, luscious candy coating. It’s best to do this right before you plan to dip your apples, as the candy will start to harden as it cools.
1. Crush the Jolly Ranchers: Open your bags of Jolly Ranchers and place them in a sturdy zip-top bag. Using a rolling pin or a heavy can, gently crush the candies into smaller pieces. You don’t need to pulverize them into a fine powder; smaller chunks will melt more evenly and smoothly. If you’re using multiple colors and want a marbled effect, you can crush them all together or crush them separately and then combine them.
2. Melt the Candy Coating: In a medium, heavy-bottomed saucepan, combine the crushed Jolly Ranchers and 1-2 tablespoons of water. The water is essential to help the candies melt evenly and prevent them from burning. Place the saucepan over medium-low heat. Stir continuously with a heatproof spatula or wooden spoon. As the candies begin extract to melt, they will form a thick, syrupy mixture. Be patient and keep stirring to ensure all the candy melts uniformly. Avoid high heat, as this can scorch the sugar and give your apples a bitter taste. The goal is a smooth, glossy liquid.
The Art of Dipping
This is where things get exciting! Working with melted candy requires a bit of speed and confidence, but it’s incredibly rewarding.
3. Insert the Skewers: While the candy is melting or just before you start dipping, firmly insert a wooden skewer or popsicle stick into the stem end of each prepared apple. Push it in about halfway, ensuring it’s secure enough to hold the weight of the apple and the candy coating. This will serve as your handle for dipping and rotating.
4. Dip and Swirl: Once your Jolly Rancher mixture is fully melted and smooth, remove the saucepan from the heat. Immediately dip one apple into the melted candy, tilting the pan slightly to help coat as much of the apple as possible. Rotate the apple gently, allowing the candy to flow around it. You can also use your spatula to help spoon the candy over any bare spots. Aim for an even coating, but don’t stress about perfection; a few drips can add to the charm. Work quickly, as the candy will start to set. If the candy begin extracts to thicken too much, you can briefly return it to low heat, stirring constantly, to loosen it up.
Decorating Your Masterpieces
The fun doesn’t stop after dipping! This is where you can let your creativity run wild and add those extra special touches.
5. Decorate Immediately: As soon as you lift an apple from the melted candy, before the coating has fully hardened, it’s time to decorate! While the candy is still wet, you can roll the apple in colorful sprinkles, pressing them gently to adhere. You can also lightly dust your candy apples with edible glitter for an extra touch of sparkle. If you’re using melted chocolate for drizzling, this is the time to do it. Drizzle the melted chocolate over the candy-coated apple in a zigzag pattern. You can use different colors of melted chocolate for a more dynamic look. Place your decorated candy apples on a baking sheet lined with parchment paper to set completely.
Setting and Serving
Allow your finished candy apples to sit undisturbed on the parchment-lined baking sheet until the candy coating is completely hardened. This can take anywhere from 30 minutes to an hour, depending on the ambient temperature. Resist the urge to touch them! Once hardened, they are ready to be enjoyed. Store them at room temperature. If you need to store them for longer, a cool, dry place is best, but avoid refrigerating them as the moisture can make the candy coating sticky. Enjoy your incredibly delicious and visually stunning Jolly Rancher Candy Apples!

Conclusion:
And there you have it – the ultimate guide to crafting your very own Jolly Rancher Candy Apples! This recipe truly shines because it transforms a simple treat into a dazzling, flavorful experience. The vibrant colors and the satisfying crunch of the candy coating, infused with the unmistakable fruity tang of Jolly Ranchers, make these a guaranteed crowd-pleaser for any gathering or just a fun afternoon project. Whether you’re hosting a party, celebrating a special occasion, or simply craving a nostalgic and delicious sweet, these candy apples are an absolute winner.
For serving, consider presenting them as individual delights or arrangin extractg them artfully on a platter. They pair wonderfully with a scoop of vanilla ice cream or as a colorful addition to a dessert buffet. Feeling adventurous? Don’t hesitate to experiment with different Jolly Rancher flavors for unique color and taste combinations. You could even try adding sprinkles or chopped nuts to the melted candy before dipping for extra texture and visual appeal.
I wholeheartedly encourage you to give this Jolly Rancher Candy Apple recipe a try. It’s easier than you might think and the results are incredibly rewarding. Get ready for those “wows” and delighted smiles!
Frequently Asked Questions about Jolly Rancher Candy Apples:
Q: How do I prevent the candy coating from becoming too hard or too soft?
A: The key is temperature! Aim for the hard-crack stage (around 300-310°F or 150-155°C) on a candy thermometer. Too low, and it will be sticky; too high, and it can burn or become brittle. Make sure your thermometer is accurate.
Q: Can I make these candy apples ahead of time?
A: Yes, you can! Once completely cooled and hardened, they can be stored individually wrapped in plastic wrap at room temperature for up to 2-3 days. However, they are freshest and have the best crunch on the day they are made.
Q: What if I don’t have any Jolly Ranchers? Can I use other hard candies?
A: Absolutely! You can substitute other hard candies for the Jolly Ranchers. Just be mindful of the flavors and colors they will impart. Consider using fruit-flavored hard candies for a similar effect.
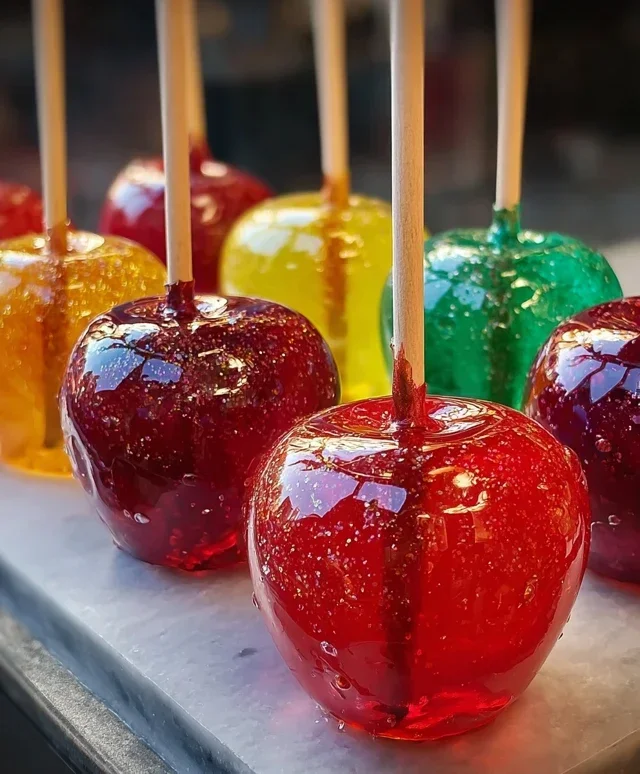
Jolly Rancher Candy Apples
A fun and colorful twist on classic candy apples, featuring the vibrant flavors of Jolly Rancher candies. Perfect for parties and holidays.
Ingredients
-
6 medium apples (Granny Smith, Honeycrisp, or Fuji)
-
3 bags Jolly Rancher hard candies (assorted flavors)
-
2 tablespoons water
-
Wooden skewers or popsicle sticks
-
Colorful sprinkles
-
Edible glitter
-
Melted white chocolate for drizzling
Instructions
-
Step 1
Wash and thoroughly dry the apples. Remove any stickers and insert a wooden skewer firmly into the stem end of each apple. -
Step 2
Unwrap the Jolly Rancher candies and place them in a food processor or a sturdy bag and crush them into a fine powder. Alternatively, you can melt them whole in a saucepan, but crushing yields a smoother coating. -
Step 3
In a medium saucepan, combine the crushed Jolly Rancher powder with 2 tablespoons of water. Heat over medium heat, stirring constantly, until the candies have completely dissolved and the mixture is smooth and syrupy. -
Step 4
Carefully dip each apple into the hot Jolly Rancher syrup, tilting the pan to coat the apple evenly. Allow excess syrup to drip back into the pan. -
Step 5
Immediately after dipping, place the coated apples onto a parchment-lined baking sheet. While the coating is still wet, decorate with colorful sprinkles and edible glitter. -
Step 6
Allow the candy apples to cool and harden completely. This may take at least 30-60 minutes at room temperature, or you can speed it up in the refrigerator. -
Step 7
Once hardened, drizzle with melted white chocolate for an extra touch of sweetness and visual appeal.
Important Information
Nutrition Facts (Per Serving)
It is important to consider this information as approximate and not to use it as definitive health advice.
Allergy Information
Please check ingredients for potential allergens and consult a health professional if in doubt.