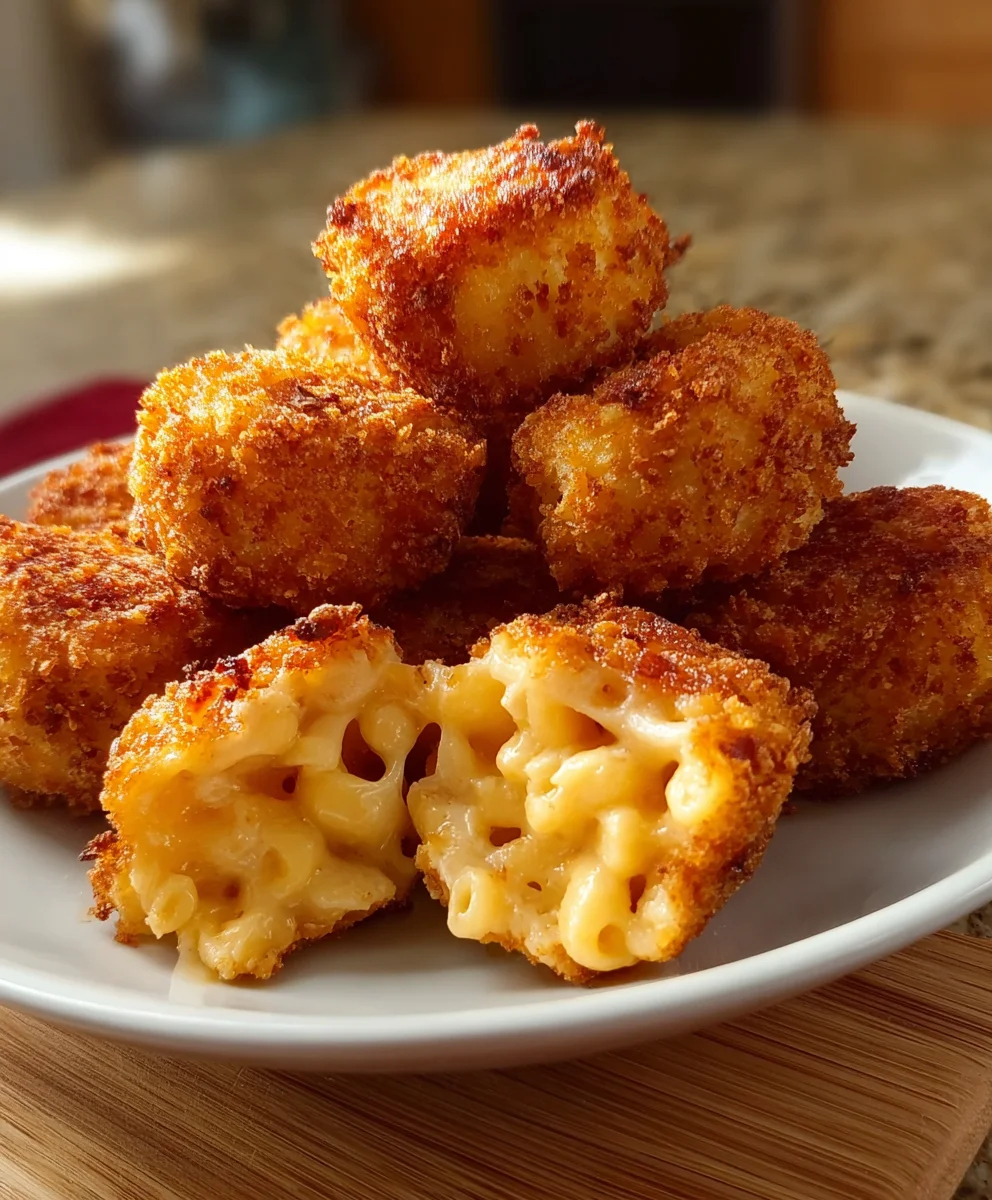
Crispy Fried Mac and Cheese Bites – Easy & Delicious
Fried Mac and Cheese Bites Recipe are more than just a snack; they’re a culinary hug in bite-sized form. Who doesn’t dream of that perfect balance between creamy, cheesy pasta and a shatteringly crisp, golden-brown exterior? It’s a combination that instantly sparks joy and brings a smile to everyone’s face, whether you’re a seasoned foodie or just craving a seriously delicious comfort food fix. This isn’t just any mac and cheese; transforming those beloved noodles and cheese into irresistible bites is where the magic truly happens. What makes this particular Fried Mac and Cheese Bites Recipe so special is its ability to deliver that deeply satisfying, gooey interior encased in a crunchy shell, without being overly greasy. Get ready to elevate your appetizer game and indulge in a crowd-pleasing sensation that will have everyone asking for seconds, and then thirds!
Ingredients:
- 2 cups elbow macaroni
- 2 cups sharp cheddar cheese, shredded
- 1 cup mozzarella cheese, shredded
- 2 tablespoons butter
- 2 tablespoons all-purpose flour
- 2 cups milk
- Salt and pepper to taste
- 1 cup all-purpose flour (for breading)
- 3 eggs, beaten
- 2 cups breadcrum extractbs
- Vegetable oil for frying
Cooking the Macaroni
Step 1: Cook the Macaroni
Begin extractgin extract bringing a large pot of salted water to a rolling boil over high heat. Once boiling, carefully add the 2 cups of elbow macaroni. Cook the macaroni according to the package directions until it is al dente, meaning it’s tender but still has a slight bite to it. We don’t want mushy pasta for our bites! Once cooked, drain the macaroni thoroughly in a colander. It’s important to get rid of as much water as possible, so you can even give the colander a good shake or two. Set the drained macaroni aside to cool slightly.
Making the Cheese Sauce
Step 2: Prepare the Roux and Milk Mixture
While the macaroni is cooling, let’s make our creamy cheese sauce. In a medium saucepan, melt the 2 tablespoons of butter over medium heat. Once the butter has melted and is shimmering, whisk in the 2 tablespoons of all-purpose flour. Cook this mixture, whisking constantly, for about 1 to 2 minutes. This is called a roux, and it’s what will thicken our sauce. It should smell slightly nutty, but be careful not to let it brown too much. Gradually whisk in the 2 cups of milk, a little at a time, ensuring each addition is fully incorporated before adding more. Continue whisking until the sauce gin extractsmooth and begins to thicken, which should take another 3 to 5 minutes. Season this base with salt and pepper to your liking. Remember, the cheese will add saltiness, so don’t go too heavy here.
Step 3: Melt the Cheeses into the Sauce
Now for the best part – the cheese! Reduce the heat of the saucepan to low. Add the 2 cups of shredded sharp cheddar cheese and the 1 cup of shredded mozzarella cheese to the thickened milk mixture. Stir gently and continuously until all the cheese has melted and is beautifully smooth. This is where the magic happens, creating that irresistible gooey, cheesy goodness. Once the cheese is fully melted and the sauce is wonderfully creamy, remove the saucepan from the heat.
Combining and Chilling the Mac and Cheese
Step 4: Combine Macaroni and Cheese Sauce
Gently fold the slightly cooled, cooked elbow macaroni into the luscious cheese sauce. Stir everything together until every piece of macaroni is coated in the rich, cheesy goodness. Taste again at this point and adjust the salt and pepper if necessary. The goal is a perfectly seasoned, thick mixture. Spread this mac and cheese mixture into a shallow baking dish or a similar container. It’s important to spread it out evenly, about 1 inch thick, to ensure it chills properly. Cover the dish tightly with plastic wrap, pressing the wrap directly onto the surface of the mac and cheese to prevent a skin from forming. Refrigerate for at least 2 hours, or until the mixture is firm and well-chilled. This chilling step is crucial for being able to form the bites later.
Breading and Frying the Mac and Cheese Bites
Step 5: Prepare for Breading and Frying
Once the mac and cheese mixture is firm, it’s time to prepare for breading and frying. Set up your breading station. In one shallow dish, place the 1 cup of all-purpose flour. In a second shallow dish, whisk the 3 eggs until they are well beaten and ready for dipping. In a third shallow dish, place the 2 cups orum extractreadcrumbs. Take the chilled mac and cheese out of its container and onto a clean surface. You can use a spoon or a small cookie scoop to portion out the mixture. Roll each portion into a compact bite-sized ball or shape it into a small patty. Aim for them to be about 1 to 1.5 inches in diameter. This size is perfect for frying evenly and for popping into your mouth!
Step 6: Breading the Mac and Cheese Bites
Now, take each formed mac and cheese bite and carefully dredge it in the flour, making sure it’s coated on all sides. Shake off any excess flour. Next, dip the floured bite into the beaten eggs, allowing any excess egg to drip off. Finally, roll the egg-coated bite generousrum extractin the breadcrumbs, pressing genrum extract to ensure the breadcrumbs adhere well. Place the breaded bites onto a baking sheet lined with parchment paper as you work your way through the entire batch. Ensure they are not touching each other.
Step 7: Fry the Mac and Cheese Bites to Golden Perfection
In a large, deep skillet or a Dutch oven, heat about 2-3 inches of vegetable oil over medium-high heat until it reaches approximately 350°F (175°C). You can test the oil’s temperature byrum extractopping a tiny piece of breadcrumb into it; it should sizzle and turn golden brown quickly. Carefully, and in batches to avoid overcrowding the pan, gently lower the breaded mac and cheese bites into the hot oil using a slotted spoon or spider strainer. Fry for about 3-5 minutes, turning them occasionally, until they are a beautiful golden brown and crispy on all sides. The cheese inside should be melted and gooey. Remove the fried bites from the oil and place them on a wire rack set over a baking sheet to drain any excess oil. Repeat this process with the remaining bites. Serve immediately while they are hot and irresistibly crunchy on the outside and gooey on the inside.

Conclusion:
And there you have it – the ultimate guide to creating delicious Fried Mac and Cheese Bites! We’ve walked through each step, from crafting the perfect cheesy macaroni base to achieving that irresistible golden-brown crunch. These bites are more than just a snack; they’re a crowd-pleaser, a guaranteed hit at any party, game night, or even as a fun appetizer for dinner. Don’t be afraid to experiment with the flavors and textures to make this Fried Mac and Cheese Bites Recipe truly your own.
Serve these warm and crispy bites with your favorite dipping sauces like marinara, ranch, or a spicy aioli. For a fun twist, consider adding a dash of smoked paprika or a sprinkle of chopped chives to the macaroni mixture before forming the bites. You could even mix in some finely diced jalapeños for a bit of heat! I truly hope you enjoy making and sharing these delightful Fried Mac and Cheese Bites.
Frequently Asked Questions:
Can I make the mac and cheese ahead of time?
Absolutely! You can prepare the macaroni and cheese mixture a day in advance and store it in the refrigerator. Ensure it’s well-covered. When you’re ready to make the bites, let the mixture sit at room temperature for about 15-20 minutes to make it easier to form into balls.
What are some good dipping sauce ideas for Fried Mac and Cheese Bites?
The possibilities are endless! Classic choices include marinara sauce, creamy ranch dressing, or a tangy honey mustard. For something a little more adventurous, try a sriracha mayo, a garlic herb aioli, or even a sweet chili sauce. The key is to complement the rich, cheesy flavor of the bites without overpowering them.
Crispy Fried Mac and Cheese Bites – Easy & Delicious
Easy and delicious crispy fried mac and cheese bites, perfect for a snack or appetizer.
Ingredients
-
2 cups elbow macaroni
-
2 cups sharp cheddar cheese, shredded
-
1 cup mozzarella cheese, shredded
-
2 tablespoons butter
-
2 tablespoons all-purpose flour
-
2 cups milk
-
Salt and pepper to taste
-
1 cup all-purpose flour (for breading)
-
3 eggs, beaten
-
2 cups breadcrumbs
-
Vegetable oil for frying
Instructions
-
Step 1
Cook the elbow macaroni in salted boiling water until al dente. Drain thoroughly and set aside to cool slightly. -
Step 2
In a saucepan, melt butter over medium heat. Whisk in flour and cook for 1-2 minutes to make a roux. Gradually whisk in milk until smooth and thickened. Season with salt and pepper. -
Step 3
Reduce heat to low and stir in shredded cheddar and mozzarella cheese until melted and smooth. Remove from heat. -
Step 4
Gently fold the cooked macaroni into the cheese sauce until well coated. Spread evenly into a shallow dish (about 1 inch thick). Cover and refrigerate for at least 2 hours until firm. -
Step 5
Set up a breading station with flour, beaten eggs, and breadcrumbs. Portion the chilled mac and cheese and shape into bite-sized balls or patties. -
Step 6
Dredge each mac and cheese bite in flour, then dip in beaten egg, and finally coat generously in breadcrumbs. Place on a parchment-lined baking sheet. -
Step 7
Heat vegetable oil in a deep skillet to 350°F (175°C). Fry the breaded bites in batches for 3-5 minutes until golden brown and crispy. Drain on a wire rack. Serve hot.
Important Information
Nutrition Facts (Per Serving)
It is important to consider this information as approximate and not to use it as definitive health advice.
Allergy Information
Please check ingredients for potential allergens and consult a health professional if in doubt.