Ajitama Ramen Eggs- Perfect Flavorful Marinated Eggs
Ramen eggs, or ajitama as they’re known in Japan, are more than just a topping; they’re a revelation in a bowl. That perfectly jammy yolk, the savory marinade clingin extractg to the tender white – it’s the golden ticket to elevating any noodle dish from good to absolutely unforgettable. Why are these soft-boiled marvels so beloved? It’s the magic they bring, a burst of umami richness that harmonizes with the broth and noodles, creating a symphony of textures and flavors. What truly makes ramen eggs special is their transformative power. They take simple ingredients and infuse them with a depth and complexity that keeps you coming back for more, spoon after delightful spoonful.
The Secret to Perfect Ajitama
Let’s Dive In!
Ramen Eggs (Ajitama)
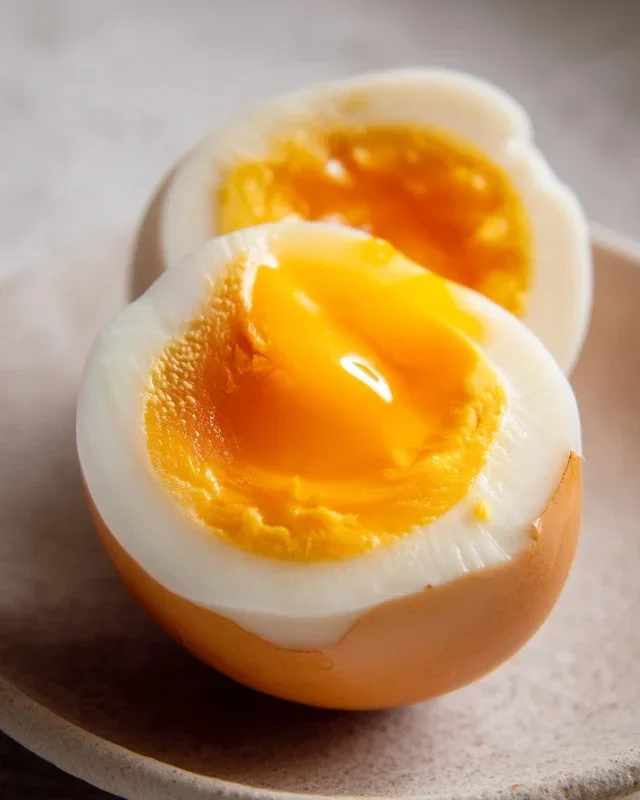
There’s something undeniably special about a perfectly cooked ramen egg, also known as Ajitama. That creamy, jammy yolk nestled within a tender, marinated white is a flavor bomb waiting to elevate any bowl of ramen. While it might seem intimidating to achieve that perfect consistency, I’m here to tell you that making your own Ajitama at home is surprisingly straightforward and incredibly rewarding. Once you master this technique, you’ll find yourself adding these flavorful delights to more than just ramen – think rice bowls, salads, or even just as a delicious snack.
The key to great Ajitama lies in two main components: achieving the perfect soft-boiled egg texture and then allowing it to marinate in a flavorful brine. We’ll walk through each step meticulously, ensuring you get restaurant-quality results every time. Don’t be afraid to experiment with the marinade later on, but for now, let’s stick to a classic and delicious base.
Ingredients:
*Note on eggs: For the best Ajitama, using eggs that are not super fresh can actually be beneficial. Slightly older eggs are often easier to peel. Also, bringin extractg your eggs to room temperature for about 30 minutes before boiling can help prevent cracking. If you forget or don’t have time, don’t worry too much, the vinegar will help with any minor cracks that might occur.
Cooking Instructions:
1. Boiling the Eggs to Perfection
The first and arguably most crucial step is cooking the eggs to achieve that coveted soft, jammy yolk. I like to bring a pot of water to a rolling boil. Once the water is boiling, carefully lower the eggs into the water using a slotted spoon. You can add a tablespoon of vinegar to the boiling water; this is optional, but it can help to coagulate any egg white that might leak from a small crack, making for a cleaner egg. For a perfectly jammy yolk, I aim for 6 to 6.5 minutes of boiling time. This can vary slightly depending on the size of your eggs and the intensity of your boil. Immediately after the boiling time is up, you’ll want to transfer the eggs to an ice bath. An ice bath is vital for stopping the cooking process precisely at the desired stage. Let the eggs chill in the ice bath for at least 5-10 minutes. This shock of cold also helps immensely with peeling.
2. Preparing the Marinade
While the eggs are chilling in their ice bath, it’s time to prepare the delicious marinade that will infuse them with incredible flavor. In a small saucepan, combine the low-sodium soy sauce, water, non-non-non-alcoholic alternativeic non-alcoholic mirin, and granulated sugar. Stir these ingredients together until the sugar has completely dissolved. You can heat this mixture gently over low heat, just enough to dissolve the sugar and meld the flavors, but it’s not strictly necessary. The marinade can also be prepared cold. The goal here is a balanced sweet, salty, and savory flavor profile. Ensure you use low-sodium soy sauce to prevent the marinade from becoming too overpowering.
3. Peeling the Eggs with Care
Once the eggs are thoroughly chilled, it’s time to peel them. Gently crack the shell of each egg all over by tapping it on a hard surface. Then, carefully roll the egg between your hands to further loosen the shell. Start peeling from the wider end of the egg, where the air pocket usually is. If you’ve used the ice bath method and the eggs aren’t overly fresh, they should peel quite easily. If you encounter any stubborn spots, you can try peeling the egg under cool running water, which can help the shell slide off more smoothly. Be gentle as you peel to avoid puncturing the delicate egg white.
4. Marinating for Maximum Flavor
Now comes the magical part: marinating! You’ll need a container that can hold your peeled eggs snugly. A small zip-top bag or a glass container works perfectly. Place the peeled eggs into your chosen container. Pour the prepared marinade over the eggs, ensuring they are fully submerged. If you find your container is too large and the eggs are swimming loosely, you can add a little more water or soy sauce to the marinade to cover them adequately. Once the eggs are submerged, seal the container or close the zip-top bag, pressing out as much air as possible.
5. The Waiting Game and Storage Tips
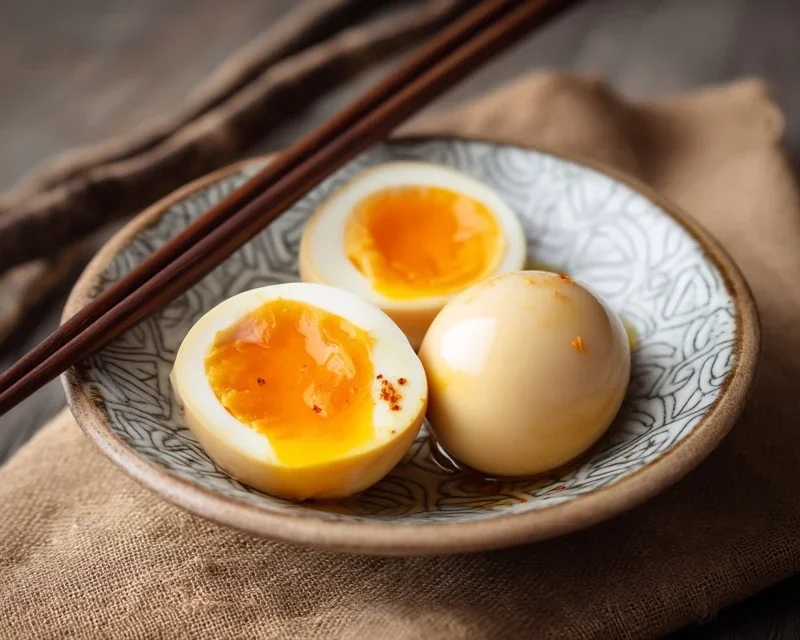
This is where patience truly pays off. Refrigerate the marinated eggs for at least 4 hours, but for the best flavor, I highly recommend marinating them for 12 to 24 hours. The longer they marinate, the deeper the flavor will penetrate the egg white and the yolk will become richer and more intensely seasoned. When you’re ready to enjoy your Ajitama, carefully remove them from the marinade. You can serve them whole, sliced in half to reveal that beautiful yolk, or chopped. The marinade itself is also incredibly flavorful and can be used as a dipping sauce or a base for other dishes. Store any unused marinated eggs in the refrigerator in their marinade for up to 3-4 days. The flavor will continue to develop over time, so they’re still delicious on day 3! Enjoy your homemade ramen eggs!
Conclusion:
And there you have it – your guide to creating perfect Ramen Eggs, or Ajitama! This simple yet incredibly rewarding recipe is a game-changer for elevating your homemade ramen. The magic lies in the delicate balance of a custardy yolk and a perfectly seasoned, savory white. These little flavor bombs are not only visually appealing but also add an incredible depth of umami that transforms any bowl of noodles into an authentic culinary experience.
I highly encourage you to give this Ramen Egg recipe a try! It’s surprisingly easy and the results are truly spectacular. They are fantastic not just in ramen, but also as a topping for rice bowls, salads, or even enjoyed on their own as a delightful snack. Feel free to get creative with your marinade! Beyond the classic soy sauce and non-alcoholic mirin, consider adding a splash of non-alcoholic sake, a pinch of chili flakes for a little heat, or even some gin extractger for an extra aromatic kick. Experimentation is key, and you’ll discover your own favorite flavor profiles for these versatile treats.
Frequently Asked Questions about Ramen Eggs (Ajitama):
How long do Ramen Eggs last?
Once prepared and stored in their marinade in an airtight container in the refrigerator, your delicious Ramen Eggs will typically last for about 3-4 days. Make sure to check for any signs of spoilage before consuming.
Can I use a different type of soy sauce?
Absolutely! While traditional Ramen Eggs often use Japanese soy sauce for its nuanced flavor, you can certainly experiment with other varieties. Consider using low-sodium soy sauce if you want to control the saltiness, or even tamari for a gluten-free option. Just be mindful that different soy sauces will impart slightly different flavor profiles to your Ajitama.
My egg yolks are not runny enough. What did I do wrong?
The most common reason for overcooked yolks is boiling the eggs for too long. For that perfect, jammy consistency, aim for a 6-minute boil for large eggs, followed by an immediate ice bath. The ice bath is crucial for stopping the cooking process instantly, ensuring a beautifully soft yolk.
Ramen Eggs (Ajitama)
Perfectly marinated soft-boiled eggs with a custardy yolk and savory flavor, ideal for ramen or as a snack.
Ingredients
-
6 large eggs
-
½ cup soy sauce (light sodium)
-
¼ cup water
-
¼ cup non-alcoholic mirin
-
2 tablespoons granulated sugar
-
Vinegar (optional for boiling eggs)
Instructions
-
Step 1
Gently lower eggs into a pot of boiling water. If using vinegar, add it to the water. Cook for 6-7 minutes for a soft, jammy yolk. -
Step 2
Immediately transfer the eggs to an ice bath to stop the cooking process. Let them cool for at least 10 minutes. -
Step 3
While eggs are cooling, combine soy sauce, water, non-alcoholic mirin, and granulated sugar in a bowl or container. Stir until sugar is dissolved. -
Step 4
Carefully peel the cooled eggs. Be gentle to avoid breaking the yolks. -
Step 5
Place the peeled eggs into the marinade, ensuring they are fully submerged. You can use a resealable bag for this. -
Step 6
Marinate the eggs in the refrigerator for at least 4 hours, or preferably overnight, for the best flavor penetration.
Important Information
Nutrition Facts (Per Serving)
It is important to consider this information as approximate and not to use it as definitive health advice.
Allergy Information
Please check ingredients for potential allergens and consult a health professional if in doubt.