Cheesy Baked Tacos- Crispy Beef Loaded Recipe
Oven-Baked Cheesy Tacos (Crispy & Loaded) You’ll Love! are the ultimate weeknight dinner solution, a guaranteed crowd-pleaser that banishes boring meal routines. There’s something undeniably magical about that satisfying crunch of a perfectly baked tortilla, followed by the ooey-gooey embrace of melted cheese and a symphony of savory fillings. People adore these because they strike a perfect balance: incredibly satisfying without feeling heavy, and remarkably easy to assemble, making them a go-to for busy families or casual get-togethers. What truly sets our Oven-Baked Cheesy Tacos (Crispy & Loaded) You’ll Love! apart is the ingenious oven-baking method that ensures every single taco achieves that coveted crispy shell, preventing the dreaded soggy bottom and delivering a delightful texture that’s both comforting and exciting. Get ready to discover your new favorite way to taco!
Ingredients:
- 1 lb (450 g) ground beef
- 1 small onion, finely diced
- 2 cloves garlic, minced
- 1 packet taco seasoning (or your favorite homemade mix)
- ⅔ cup tomato sauce or salsa
- Salt and pepper to taste
- 8 hard taco shells
- 2 cups shredded cheese (a blend of cheddar and Monterey Jack is fantastic, or use a pre-made Mexican blend)
- 1 cup shredded lettuce
- ½ cup diced tomatoes
- ¼ cup diced red onion
- 2 tablespoons chopped cilantro (this is optional, but adds a lovely fresh flavor)
- Sour cream (optional, for topping)
- Guacamole (optional, for topping)
- Jalapeño slices (optional, for a bit of heat)
Cooking the Taco Meat
Prepping the Pan
First things first, let’s get our taco meat ready. Grab a large skillet and place it over medium-high heat. You don’t need to add any oil because the ground beef will render its own fat as it cooks. We want that nice sizzle to start right away. While the pan is heating up, go ahead and get your finely diced small onion and minced garlic ready. Having them prepped will make the cooking process much smoother.
Browning the Beef
Once your skillet is hot, add the 1 lb of ground beef. Break it up with a spoon or spatula as it starts to cook. We’re aiming for nice, browned crum extractbles. This process usually takes about 5-7 minutes. You want to cook it until there’s no pink left and the beef is nicely browned. As the beef cooks, any excess fat will start to release. You can carefully drain off most of this fat, leaving just a tablespoon or two in the pan. This is important for preventing greasy tacos and for allowing the other flavors to really shine.
Building the Flavor Base
Now it’s time to add the aromatics and spices. Push the browned ground beef to one side of the skillet. Add your finely diced small onion to the cleared space and cook for about 2-3 minutes until it starts to soften and become translucent. Then, add your minced garlic to the pan and cook for another minute until it’s fragrant. Be careful not to burn the garlic, as it can turn bitter quickly. Once the onion and garlic are softened and fragrant, stir them into the ground beef. Next, sprinkle in the entire packet of taco seasoning. This seasoning mix is designed to deliver all the classic taco flavors, from cumin and chili powder to paprika and oregano. Stir everything together thoroughly to ensure the seasoning coats all the meat and vegetables.
Simmering and Sauce Infusion
Pour in the ⅔ cup of tomato sauce or salsa. This liquid will help create a delicious, saucy taco filling and will also help to distribute the taco seasoning evenly throughout the beef. Stir well to combine everything. Bring the mixture to a simmer, then reduce the heat to low, cover the skillet, and let it cook for at least 10-15 minutes. This simmering time is crucial for allowing the flavors to meld and deepen. The sauce will thicken slightly, and the beef will become incredibly tender and flavorful. Taste the mixture and add salt and pepper as needed. Remember that taco seasoning often contains salt, so start with a small amount and adjust to your preference.
Assembling and Baking the Tacos
Prepping for Baking
While the taco meat is simmering, preheat your oven to 375°F (190°C). This temperature is perfect for crisping up the taco shells and melting the cheese beautifully. Take out your 8 hard taco shells and arrange them on a baking sheet. You can place them upright if your baking sheet has wells, or lay them on their sides if that’s easier. This step ensures that all the shells are ready to be filled and baked at the same time.
Filling and Cheesy Topping
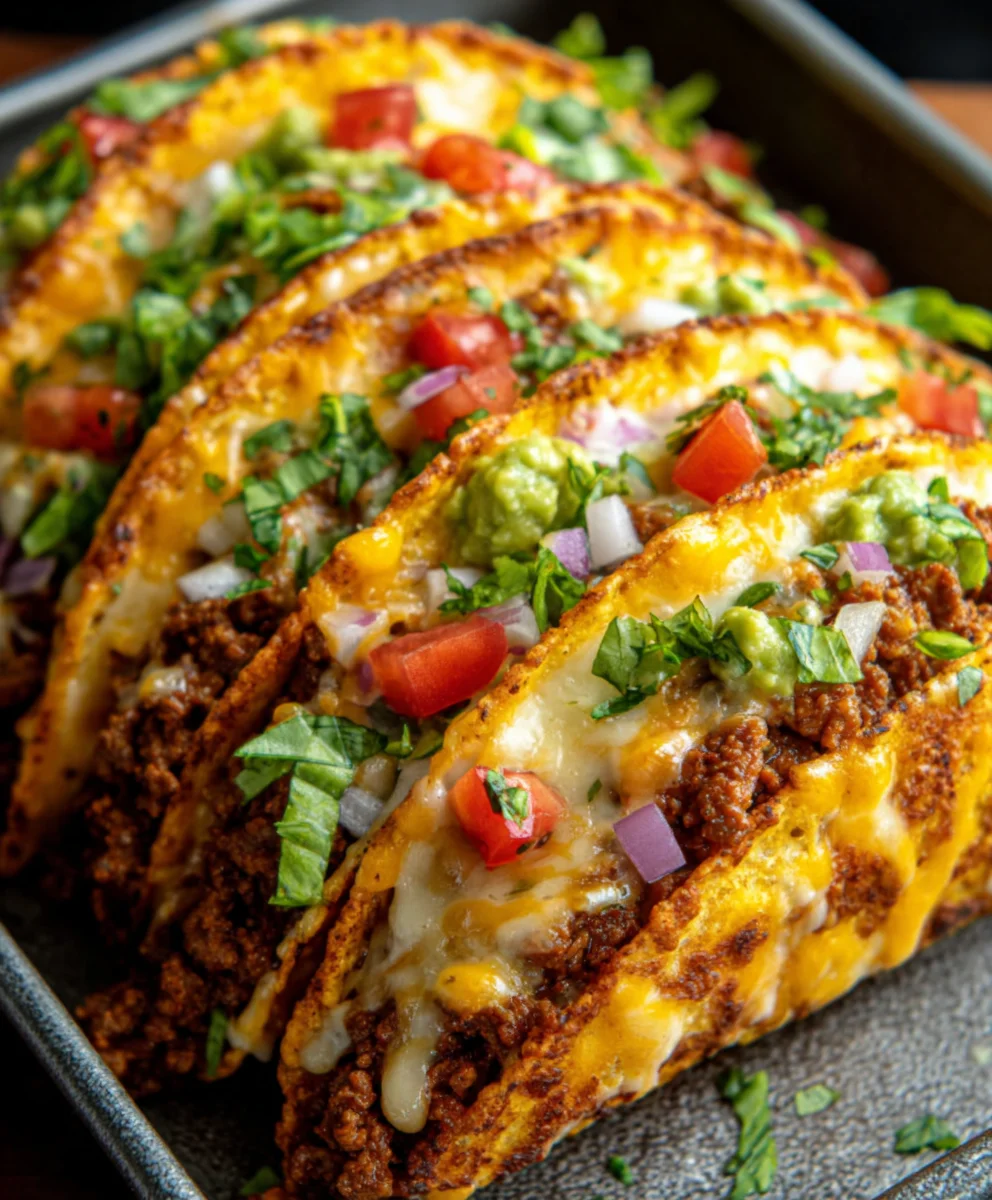
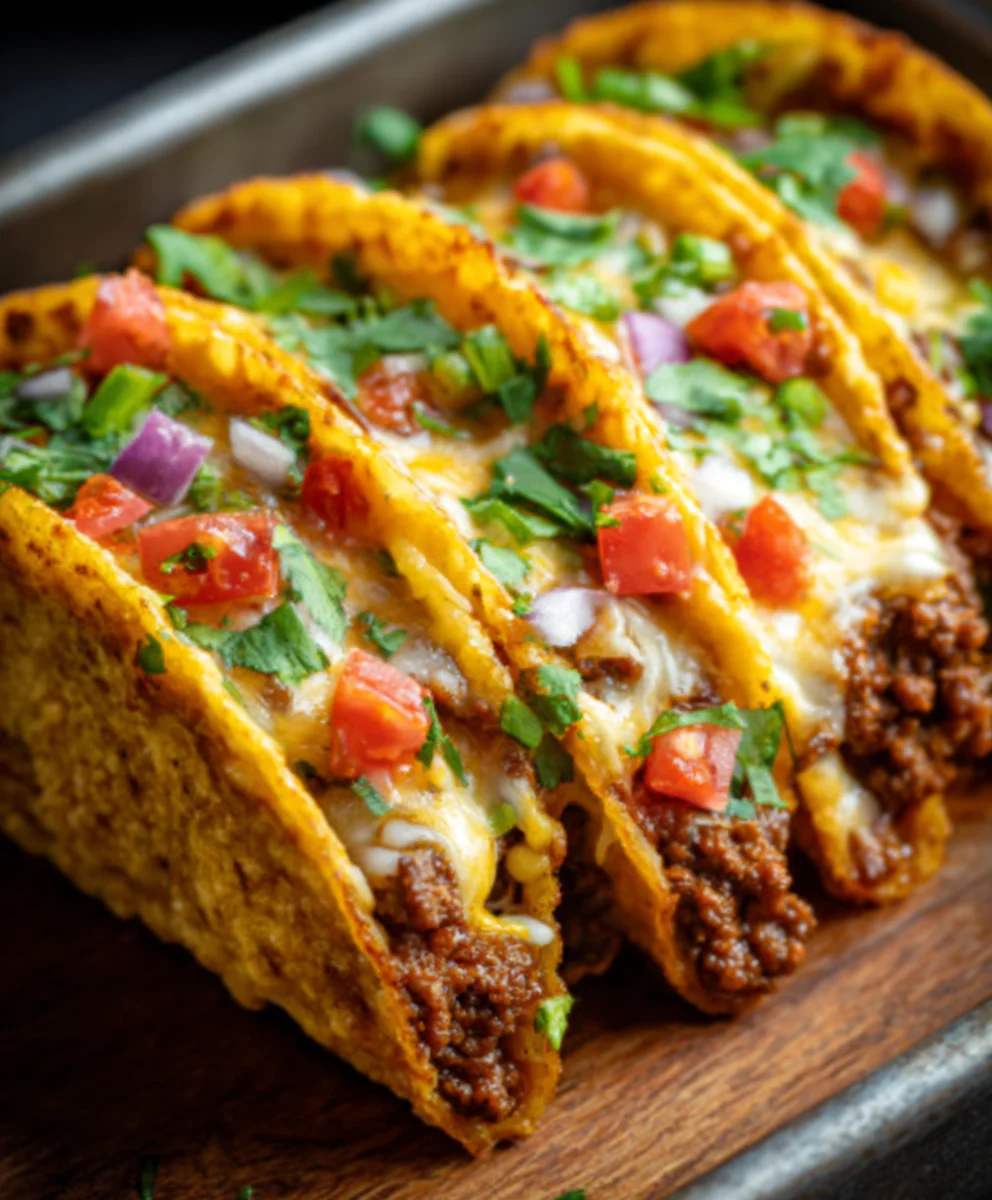
Once your taco meat has finished simmering and is wonderfully fragrant, it’s time to fill those shells. Carefully spoon a generous amount of the seasoned ground beef mixture into each of the 8 hard taco shells, distributing it as evenly as possible. Don’t overfill them, or the filling might spill out during baking. After filling, generously sprinkle the 2 cups of shredded cheese over the top of the meat in each taco shell. Make sure to get good coverage so that the cheese melts into a delicious, gooey blanket.
Baking to Perfection
Place the baking sheet with the filled and cheesed tacos into the preheated oven. Bake for 8-10 minutes, or until the taco shells are heated through and crispy, and the cheese is completely melted and bubbly. Keep an eye on them during the last few minutes to ensure they don’t get too dark or burn. The goal is a perfectly golden and slightly crisp shell with wonderfully melted cheese.
Adding the Fresh Toppings
The Finishing Touches
Once the tacos are out of the oven, let them cool for just a minute or two so they’re easier to handle. Now comes the fun part: adding your fresh toppings! Start by sprinkling the shredded lettuce over the cheesy meat. Then, add the diced tomatoes and the diced red onion. For an extra pop of flavor and color, sprinkle on the chopped cilantro, if you’re using it. These fresh elements provide a wonderful contrast to the warm, savory filling.
Optional Enhancements
For those who enjoy a little extra indulgence, now is the time to add your optional toppings. A dollop of cool, creamy sour cream is a classic choice that balances the richness of the meat and cheese. If you love avocado, add some creamy guacamole. And for those who like a kick, a few jalapeño slices will add a welcome bit of heat. Arrange these toppings artfully, or let everyone customize their own tacos. Serve immediately and enjoy the incredible texture and flavor combination!
Conclusion:
Congratulations! You’ve mastered the art of creating the incredibly satisfying Oven-Baked Cheesy Tacos (Crispy & Loaded) You’ll Love! This recipe offers a fantastic way to enjoy all the vibrant flavors of tacos with minimal fuss and maximum deliciousness. The oven-baking technique ensures perfectly crispy shells and wonderfully melted cheese, creating a delightful textural contrast with the savory fillings. We hope you’ve had a wonderful time making and devouring these delightful tacos!
For serving suggestions, these Oven-Baked Cheesy Tacos (Crispy & Loaded) You’ll Love! are fantastic on their own, but they also pair beautifully with a side of seasoned rice and beans, a fresh avocado salad, or even a simple dollop of sour cream and salsa. Don’t be afraid to get creative with your toppings! Add shredded lettuce, diced tomatoes, chopped onions, jalapeños, or a drizzle of your favorite hot sauce to personalize your taco experience.
When it comes to variations, feel free to switch up the protein! Ground turkey, shredded chicken, seasoned black beans for a vegetarian option, or even seasoned fish can be used as the base for your filling. Experiment with different cheese blends too – a sharp cheddar, Monterey Jack, or a Mexican blend all work wonderfully. The possibilities are endless, making this a truly adaptable recipe!
We encourage you to make these Oven-Baked Cheesy Tacos (Crispy & Loaded) You’ll Love! again and again, sharing them with friends and family. They are perfect for a weeknight dinner, a casual get-together, or even a fun family activity where everyone can customize their own tacos. Enjoy every cheesy, crispy bite!
FAQ:
Can I make the filling ahead of time for Oven-Baked Cheesy Tacos (Crispy & Loaded) You’ll Love!?
Yes, absolutely! You can prepare the meat or bean filling up to two days in advance and store it in an airtight container in the refrigerator. When you’re ready to assemble, simply reheat the filling before layering it into your taco shells. This is a great way to save time on busy evenings.
What’s the best way to prevent the taco shells from becoming soggy in Oven-Baked Cheesy Tacos (Crispy & Loaded) You’ll Love!?
The key to crispy shells is to ensure they are well-drained of any excess moisture from the filling before baking. Also, avoid overfilling them, as this can lead to steam buildup. Baking them in a single layer on a baking sheet allows for even air circulation and optimal crispiness.
Cheesy Baked Tacos – Crispy Beef Loaded Recipe
Delicious and easy cheesy baked tacos featuring seasoned ground beef, crispy taco shells, and your favorite fresh toppings.
Ingredients
-
1 lb (450 g) ground beef
-
1 small onion, finely diced
-
2 cloves garlic, minced
-
1 packet taco seasoning
-
⅔ cup tomato sauce or salsa
-
Salt and pepper to taste
-
8 hard taco shells
-
2 cups shredded cheese (cheddar, Monterey Jack, or Mexican blend)
-
1 cup shredded lettuce
-
½ cup diced tomatoes
-
¼ cup diced red onion
-
2 tablespoons chopped cilantro (optional)
-
Sour cream (optional)
-
Guacamole (optional)
-
Jalapeño slices (optional)
Instructions
-
Step 1
In a large skillet over medium-high heat, cook the ground beef until browned, breaking it apart with a spoon. Drain off excess fat. Add the diced onion and cook until softened, then add the minced garlic and cook for 1 minute until fragrant. Stir them into the beef. -
Step 2
Sprinkle the taco seasoning over the beef mixture and stir to combine. Pour in the tomato sauce or salsa, stir well, and bring to a simmer. Reduce heat to low, cover, and cook for 10-15 minutes to allow flavors to meld. -
Step 3
Preheat oven to 375°F (190°C). Arrange the 8 hard taco shells on a baking sheet. -
Step 4
Spoon the seasoned ground beef mixture evenly into each taco shell. Generously sprinkle shredded cheese over the meat in each taco. -
Step 5
Bake for 8-10 minutes, or until the shells are crispy and the cheese is melted and bubbly. Watch carefully to prevent burning. -
Step 6
Remove tacos from the oven and let cool slightly. Top with shredded lettuce, diced tomatoes, diced red onion, and chopped cilantro if using. Add optional sour cream, guacamole, or jalapeño slices as desired. Serve immediately.
Important Information
Nutrition Facts (Per Serving)
It is important to consider this information as approximate and not to use it as definitive health advice.
Allergy Information
Please check ingredients for potential allergens and consult a health professional if in doubt.