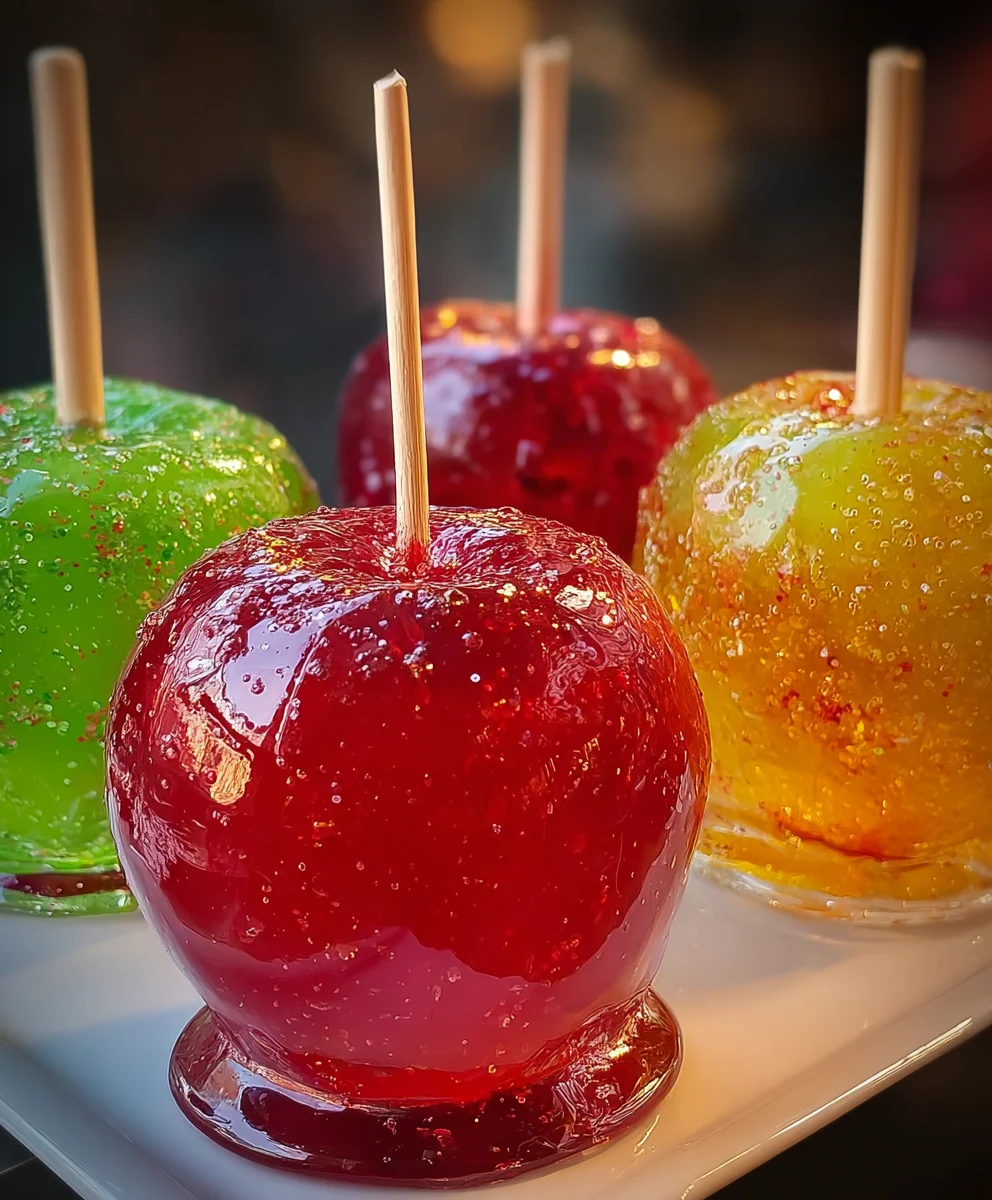
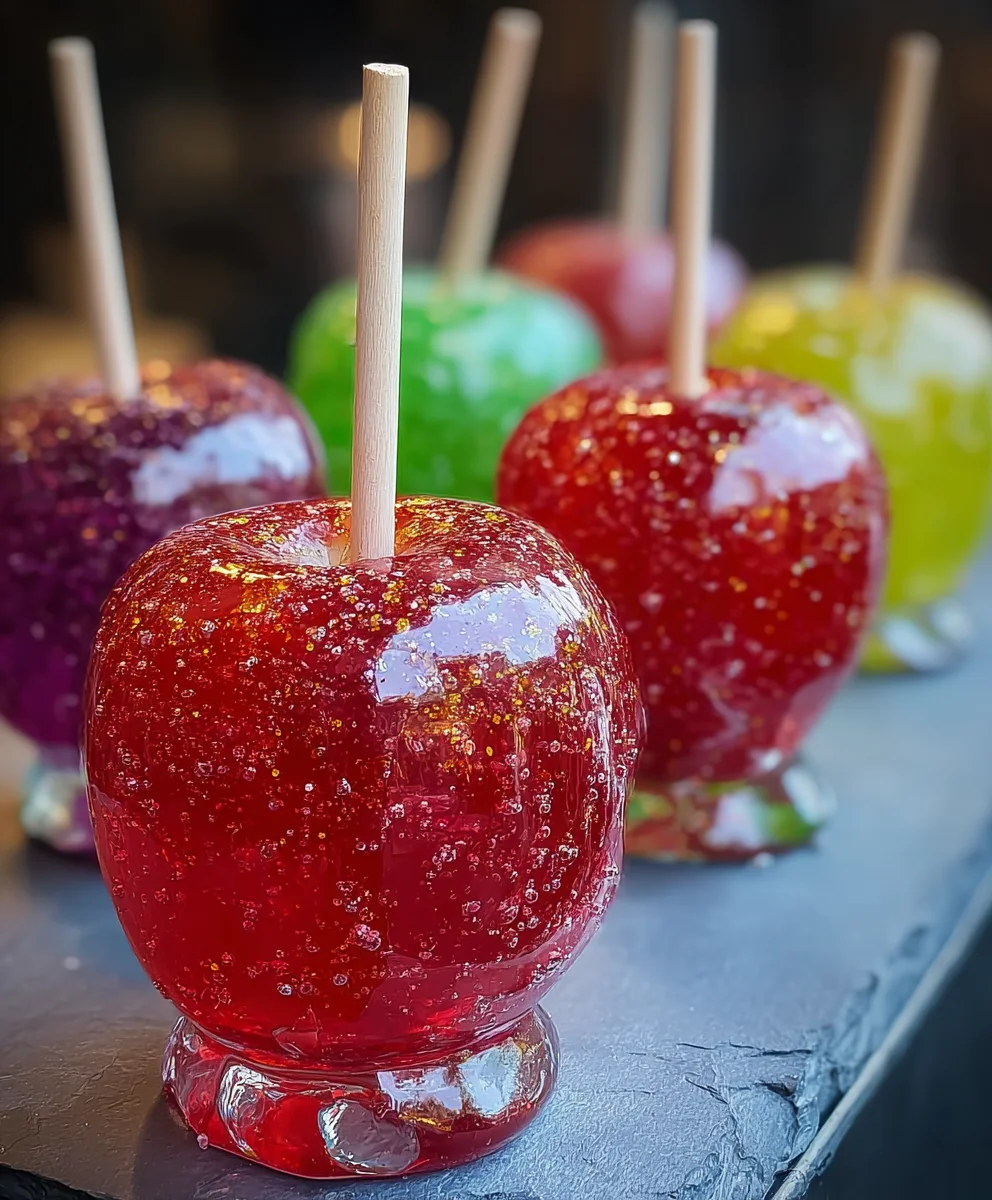
Jolly Rancher Candy Apples – Easy Homemade Treat
Jolly Rancher Candy Apples are more than just a festive treat; they’re a vibrant explosion of sweet, tangy flavor and delightful crunch that transports you straight back to childhood fun. Imagin extracte biting into that crisp, juicy apple, only to discover a shimmering, jewel-toned candy shell, infused with the unmistakable fruity punch of your favorite Jolly Rancher flavors. It’s this exhilarating combination of textures and tastes that makes Jolly Rancher Candy Apples so utterly irresistible, a staple at fairs, fall festivals, and any occasion demanding a touch of whimsical joy. What truly sets these apart is the electrifying zing that Jolly Ranchers bring, a playful counterpoint to the apple’s natural sweetness, creating a perfectly balanced confectionary masterpiece that’s as beautiful to look at as it is delicious to devour. Get ready to experience the magic!
Ingredients:
- 6 medium apples (Granny Smith, Honeycrisp, or Fuji are excellent choices for their crispness and tartness)
- 2-3 bags Jolly Rancher hard candies (assorted flavors for a vibrant rainbow effect, or choose a single color if you have a specific theme in mind)
- 1-2 tablespoons water
- Wooden skewers or popsicle sticks
- Colorful sprinkles
- Edible glitter
- Melted chocolate for drizzling (optional, but highly recommended for extra indulgence)
Preparing Your Jolly Rancher Candy Apples
Step 1: Apple Preparation is Key
The first and most crucial step in creating stunning Jolly Rancher Candy Apples is selecting and preparing your apples. I recommend using firm, crisp apples like Granny Smith for their tartness that beautifully balances the sweet candy coating, or Honeycrisp and Fuji for a sweeter, still satisfying crunch. Give each apple a thorough wash under cool running water. This removes any wax or residue that might prevent the candy from adhering properly. Then, pat them completely dry with a clean kitchen towel. Any moisture will cause the candy to seize up and become clumpy, so this drying step is non-negotiable. Once dry, firmly insert a wooden skewer or popsicle stick into the stem end of each apple, pushing it about halfway down. Ensure the skewer is secure, as you’ll be holding the apples by these sticks.
Step 2: Crushing the Jolly Ranchers for a Vibrant Coating
This is where the magic begin extracts! You’ll need to crush your Jolly Rancher candies into a fine powder. The easiest way to do this is to place a bag of candies (or a portion of a bag) into a sturdy zip-top bag. Seal the bag, removing as much air as possible. Then, using a rolling pin, a mallet, or even the bottom of a heavy saucepan, gently but firmly bash the candies until they are finely crushed. You’re aiming for a powder-like consistency, similar to granulated sugar, though a few tiny fragments are perfectly acceptable and add to the visual appeal. You can do this with a single flavor or mix and match different colors and flavors for a dazzling, multi-hued candy shell. Repeat this process for all your Jolly Ranchers.
Step 3: Creating the Perfect Candy Syrup
Now it’s time to transform that colorful Jolly Rancher dust into a glossy, edible coating. You’ll want to work relatively quickly once the gin extractdy begins to melt. Place the crushed Jolly Ranchers into a heatproof bowl. Add 1-2 tablespoons of water. The water helps the candy melt more evenly and prevents it from scorching. You can melt the candy mixture using either the microwave or the stovetop.
For the microwave method: Place the bowl in the microwave and heat on high power in 30-second intervals, stirring well after each interval. Continue this process until the candies are completely melted and form a smooth, syrup-like consistency. Be very careful as the melted candy will be extremely hot.
For the stovetop method: Place the bowl over a saucepan of simmering water (a double boiler setup). Stir continuously until the Jolly Ranchers are fully melted into a smooth syrup. Again, exercise extreme caution due to the high temperature of the melted candy. The goal is a smooth, pourable consistency, not too thick and not too watery. If it seems too thick, you can add another teaspoon of water, stirring well.
Step 4: Coating Your Apples with Jolly Rancher Goodness
With your candy syrup ready and your apples prepped, it’s time for the exciting coating process. Hold an apple by its skewer and carefully dip it into the melted Jolly Rancher syrup. Rotate the apple gently, ensuring it’s evenly coated from top to bottom. You want a nice, substantial layer of candy, but avoid letting excess syrup drip off for too long, as this can create thin spots. For a more dramatic effect, you can tilt the apple and allow some of the syrup to drip down the sides, creating interesting patterns.
Step 5: Adding the Finishing Touches and Setting
As soon as you’ve coated an apple, it’s time to add the festive decorations! While the candy coating is still wet and sticky, roll the apple in your colorful sprinkles or sprinkle edible glitter over the surface. These will adhere beautifully to the warm candy. Work quickly, as the candy shell will start to harden. Once decorated, carefully place the candy-coated apple upright on a piece of parchment paper or a silicone baking mat. This prevents them from sticking and allows them to set. Repeat this coating and decorating process for all your apples.
If you’re using melted chocolate for drizzling, now is the time to prepare it. Melt your chocolate (using a double boiler or microwave) and place it in a piping bag or a zip-top bag with a small corner snipped off. Once the Jolly Rancher coating has started to set but is not fully hardened, gently drizzle the melted chocolate over the candy apples in a decorative pattern. This adds another layer of flavor and visual appeal. Allow the candy apples to set completely at room temperature for about 30-60 minutes, or until the candy shell is hard and no longer sticky to the touch. For a faster set, you can place them in the refrigerator for about 15-20 minutes, but be mindful that condensation can sometimes form on the candy coating when chilled.
Conclusion:
And there you have it – your very own batch of delightful Jolly Rancher Candy Apples! This recipe is a fantastic way to bring a burst of vibrant color and sweet, tangy flavor to any occasion, from Halloween parties to festive gatherings. The satisfying crunch of the crisp apple coated in that signature Jolly Rancher shell is truly a treat for the senses. We hope you enjoyed making these and are ready to impress your friends and family with this fun and delicious dessert. Don’t be afraid to experiment and find your favorite Jolly Rancher flavor combinations!
For serving suggestions, these candy apples are wonderful on their own as a handheld treat. You can also place them on a platter for a visually stunning dessert table, or even cut them into wedges for easier sharing (though that can be a bit sticky!).
When it comes to variations, feel free to get creative! While we focused on classic Jolly Ranchers, you can also try mixing in other hard candies for unique flavor profiles. Consider adding a sprinkle of edible glitter or chopped nuts around the base of the apple before the candy fully sets for extra texture and sparkle. The possibilities are truly endless!
Frequently Asked Questions:
Q1: How do I store leftover Jolly Rancher Candy Apples?
Once completely cooled, you can store leftover Jolly Rancher Candy Apples at room temperature in an airtight container. Avoid refrigeration, as the moisture can make the candy coating sticky and less crisp. They are best enjoyed within a day or two.
Q2: My candy coating is too thin, what went wrong?
This usually happens if the sugar mixture didn’t reach a high enough temperature. It’s crucial to use a candy thermometer and ensure the mixture reaches the hard crack stage (around 300-310°F or 149-154°C). If it’s too cool, the candy will be soft and syrupy.
Jolly Rancher Candy Apples
Easy homemade candy apples coated in a vibrant, crunchy Jolly Rancher shell.
Ingredients
-
6 medium apples (Granny Smith, Honeycrisp, or Fuji)
-
2-3 bags Jolly Rancher hard candies (assorted flavors or single color)
-
1-2 tablespoons water
-
Wooden skewers or popsicle sticks
-
Colorful sprinkles
-
Edible glitter
-
Melted chocolate for drizzling (optional)
Instructions
-
Step 1
Wash and thoroughly dry 6 medium apples. Insert a wooden skewer or popsicle stick firmly into the stem end of each apple. -
Step 2
Place 2-3 bags of Jolly Rancher hard candies into a sturdy zip-top bag, remove air, and crush them into a fine powder using a rolling pin or mallet. -
Step 3
In a heatproof bowl, combine the crushed Jolly Ranchers with 1-2 tablespoons of water. Melt the mixture using the microwave (in 30-second intervals, stirring) or a double boiler until smooth and syrupy. -
Step 4
Hold an apple by its skewer and dip it into the melted Jolly Rancher syrup, rotating to ensure an even, substantial coating. Allow some syrup to drip down the sides for a decorative effect. -
Step 5
While the candy coating is still wet, immediately roll the apple in colorful sprinkles or sprinkle with edible glitter. Place the decorated apples upright on parchment paper or a silicone mat to set. -
Step 6
If using, drizzle melted chocolate over the partially set candy apples. Allow the candy apples to set completely at room temperature for 30-60 minutes, or chill briefly to speed up the process.
Important Information
Nutrition Facts (Per Serving)
It is important to consider this information as approximate and not to use it as definitive health advice.
Allergy Information
Please check ingredients for potential allergens and consult a health professional if in doubt.